30. How to set initial value for Switch item to True?
31. I have purchased your theme. Now what?
32. I want to change the position of section's background image on mobile resolutions so users do not see the center part of the image. How can I do that?
33. Is there some way I can see all the icons of Estato theme?
34. How to translate plugin?
35. I want to add custom CSS statements to style my calculator. Where should I add them?
36. How to set initial value for Text item?
37. How to change H tag in page headline?
38. How to make a page load with accordion items closed by default
39. Is there some way I can see all the icons of Finance theme?
40. How to install Bold Timeline plugin?
41. SVG Image format
42. How to set Event week view?
43. Contact form visible by default
44. Cost Calculator purchase code
45. Is there some way I can see all the icons of Medicare theme?
46. How to add custom icons?
47. How to translate theme?
48. Missing Google API key - Google Map
49. How to edit Footer area?
50. Will I loose content when updating the plugin?
51. How to change the settings only on one page?
52. How to set the initial value for Select item?
53. Generate API Key / Select AI Model
54. Is there some way I can see all the icons of Craft Portfolio theme?
55. How to update plugin?
56. I want to use a child theme. How can I do that?
57. How to increase the size of the logo?
58. Issues with Grid layout
59. How to make a page load with accordion items closed by default
60. How to edit 404 page?
61. How to change logo?
62. Header title is displaying site name
63. How to add custom Icon Font to Bold Timeline
64. How to prevent selection of weekends in date picker?
65. How to add new Font icons?
66. Frontend Editor
67. RTL Support
68. How to import premade templates
69. How to change the settings only on one page?
70. I am getting "The Link You Followed Has Expired” Error in WordPress when trying to upload the plugin.
71. How do I get 1.000 format for the total value?
72. Is there some way I can see all the icons of Shopscape theme?
73. How to choose Home page version?
74. How to edit widgets?
75. How to change the Excerpt text?
76. How to change the header and edit other Single Shop Product page settings?
77. Is there some way I can see all the icons of Celebration theme?
78. How to edit Footer area on Kids Club theme?
79. How to increase size of the logo?
80. Missing style sheet error when installing the theme
81. I can’t upload plugin. It’s saying it is invalid. What went wrong?
82. How to add new icon?
83. How to translate plugin?
84. How to make a page load with accordion items closed by default
85. How to disable Overlay Grid Lines?
86. How to add additional fields to contact form part of Cost Calculator?
87. How to hide hover image effect?
88. AI Feature
89. How to make a page load with accordion items closed by default
90. How to increase the size of the logo?
91. Installing Plugins
92. How to increase the size of the logo?
93. How to update a plugin?
94. How to edit Footer area on the theme?
95. I can’t upload plugin. It’s saying it is invalid. What went wrong?
96. How to make a page load with accordion items closed by default
97. How to edit Footer area?
98. How to change the header and edit other Single Post settings?
99. How to change the header and edit other Single pages of Portfolio items settings?
100. How to change the Excerpt text and Header background image?
101. How to place more than one marker on the map?
102. Where is my Purchase Code?
103. How to edit clients email?
104. Is there some way I can see all the icons of the theme?
105. Installing Demo Content
106. How to update installed theme? Will it change data?
107. Importing Demo
108. How to install Hero Posts plugin
109. My articles are not visible on homepage
110. How to increase the size of the logo?
111. Theme update - Ad Astra to Ajani
112. Installing Demo Data
113. How to leave a review?
114. How to set initial value for Slider item?
115. How to add custom icon font
116. Is there some way I can see all the icons of the theme?
117. Embed code I have placed using text element is being cut off. It does not have the proper height. How can I resolve this?
118. How to translate plugin?
119. How to add new Font icons?
120. How to add custom icon font to the theme
121. How to change H tag in page headline?
122. How to make a page load with accordion items closed by default
123. New YIHT 2.2.0 version broke my site - Problem is solved!
124. How to enter Purchase Code?
125. How to update a plugin?
126. Sticky Header scroll
127. How to create One page
128. How to increase the size of the logo?
129. Is there some way I can see all the icons of Organic Food theme?
130. How to add Custom Font to your theme
131. How to change the header and edit other Single Post settings?
132. How to edit Footer area?
133. How to redirect users to another page after the "Next" button?
134. How to edit Footer area?
135. How to ask for a refund?
136. How to make a page load with accordion items closed by default
137. How to enter Purchase Code?
138. How to have a Split Screen page
139. Installing Demo Content
1. Installing Demo Content
The best way to start is to install demo content. If you want to install demo content please do the following:
1. Start with fresh WordPress installation and make sure that theme and required plugins
are installed.
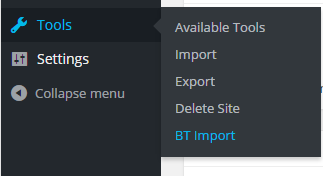
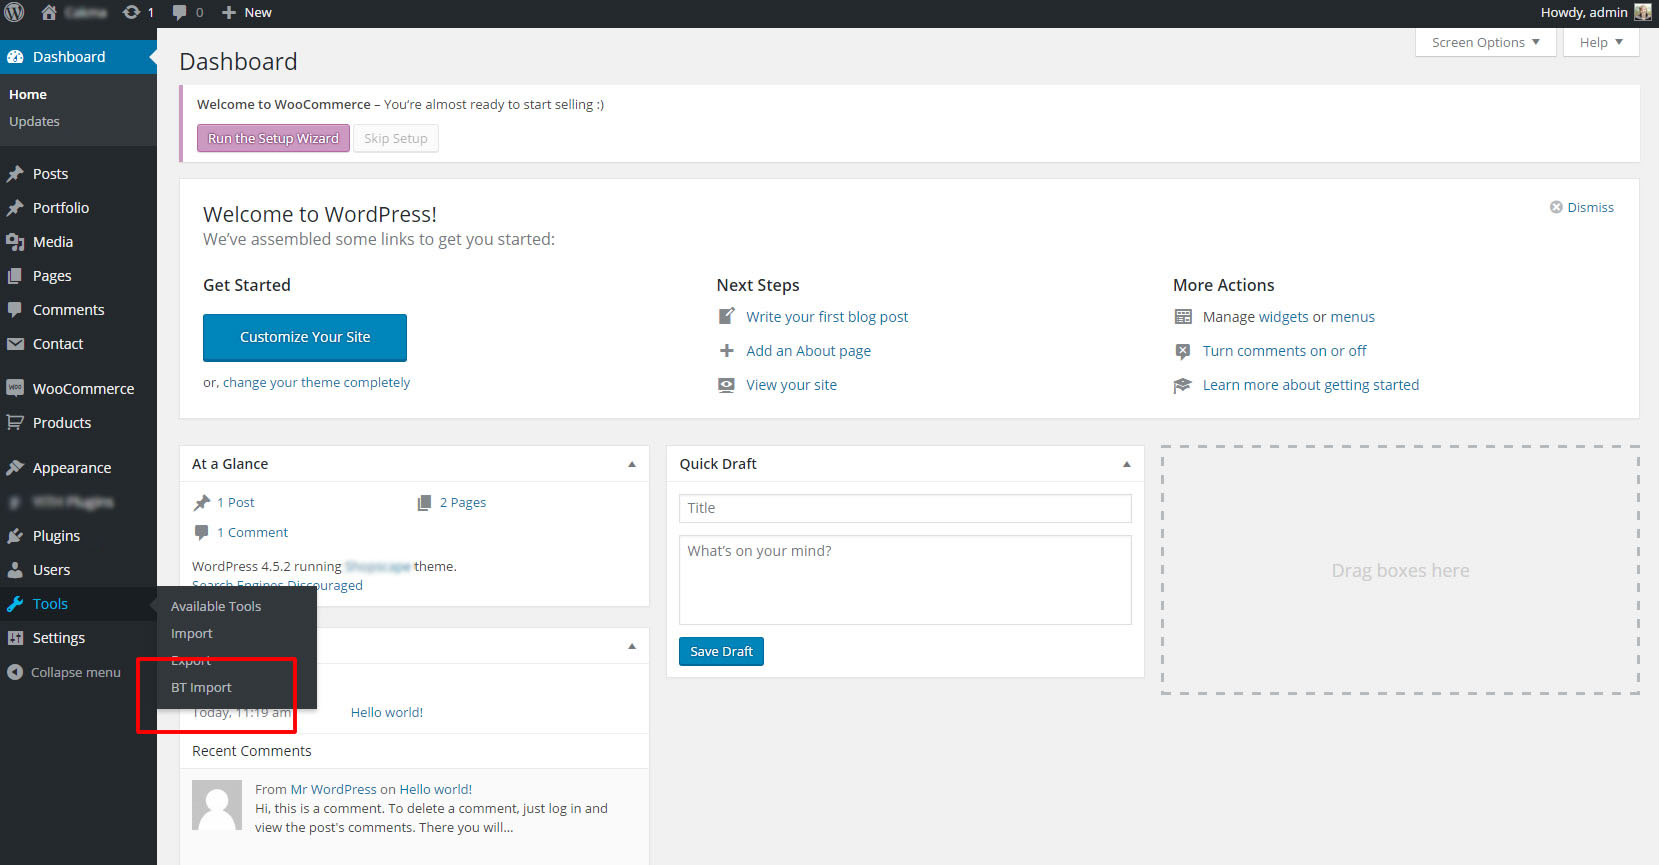
2. Go to ‘Tools > BT Import’ and select demo which you want to install.
3. Wait until you get message that import is finished. If you see red colored error message,
go to Media Library and delete any unfinished downloads (images) and repeat the
import.
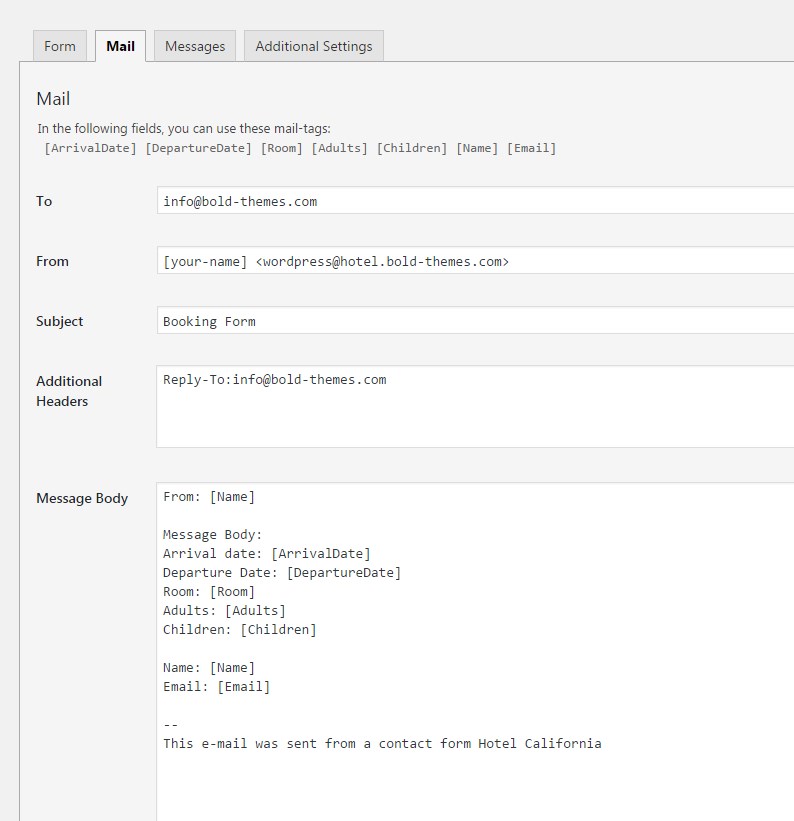
2. How to edit Booking Form?
Third Party plugin Contact Form 7 is used for Booking Form in Hotel California theme.
Once you edit labels (Arrival Date, departure date, Adults etc.) according to your needs, please have a look at the following codes, as an example of Message Body:
Once you do this, The font will be visible in all select boxes throughout wp-admin just as default Google Fonts and you will be able to select it just as any other
4. Can I redirect users to another page after submitting message?
Since Cost Calculator Version 1.2.1, Cost Calculator Settings contain the field for URL that you want your users to be redirected to.
In order to redirect users to another page after submitting the form, add the URL to ‘Optional URL for confirmation’ field.
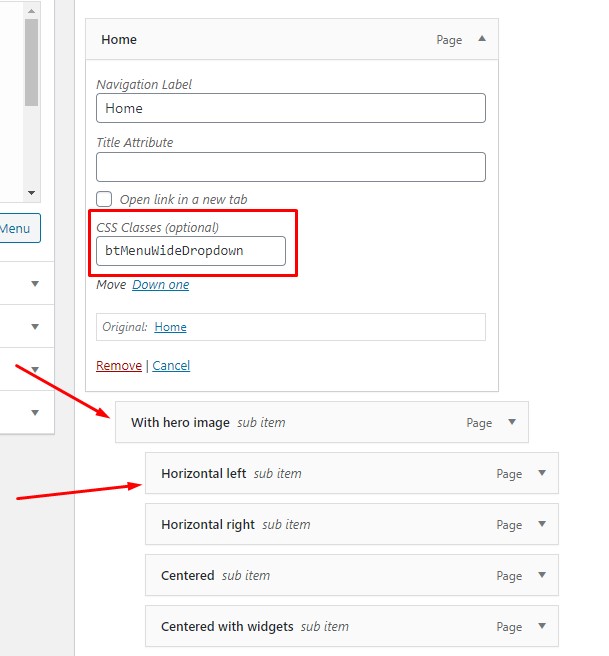
5. How to create mega menu?
In order to create mega menu please navigate to Appearance >Menus and enable CSS Classes in Screen Options, on top of your dashboard.
Then add the btMenuWideDropdown class to the parent menu item (the first item you want in your mega menu).
In order for mega menu to display correctly top menu item needs to have sub menu items, and those sub menu items need to have their child items.
The example is from our Medicare theme, but the steps are the same for all themes.
*Note that frontend display may vary depending on the theme you are using.
6. How to add custom icons using child theme?
Please refer to the instruction below on how to add custom icons to your site using child theme:
1. Create and activate child theme on your site.
You can find detailed instructions on how to create and activate child theme in the theme documentation.
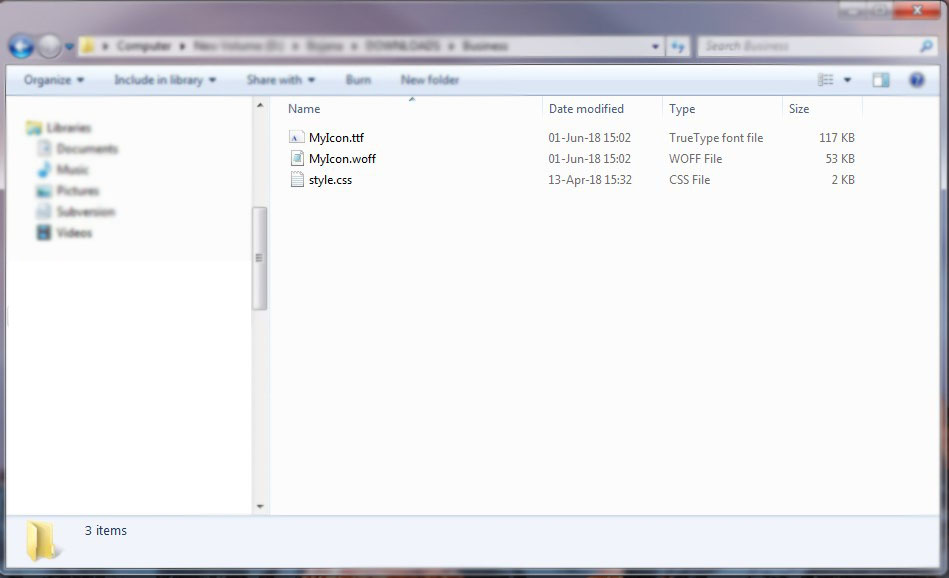
2. Create icon folder (e.g. MyIcon) with required items:
Make sure that your icon folder contains .ttf and .woff files, as well as CSS file with icons' names and glyph codes. If it doesn't have these files, you could use IcoMoon to generate the files.
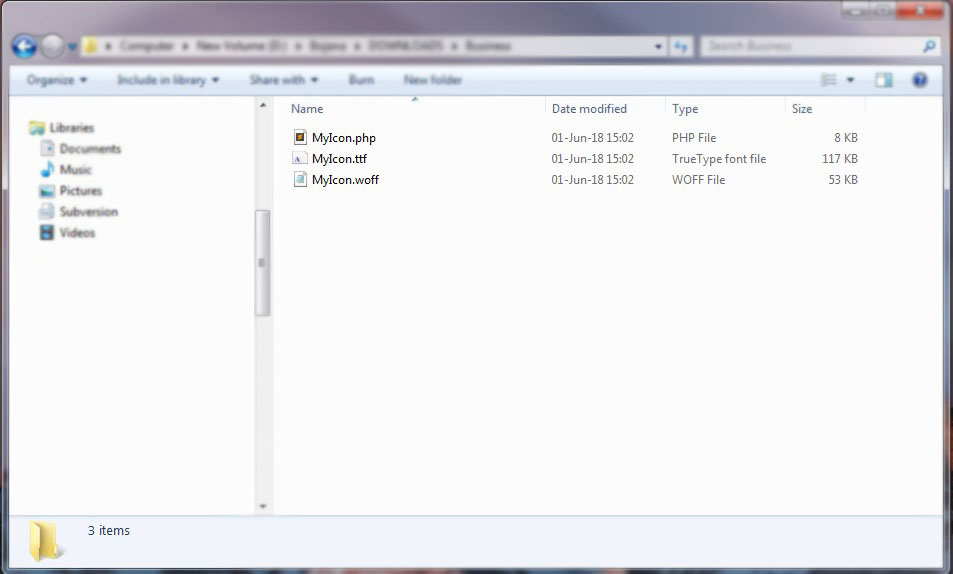
3. Create PHP file for your icons:
The PHP file should be named as the icons (for example, MyIcon). As an example of how the PHP file should look, you can use one of the existing fonts and copy their files' content, and replace it with your glyph codes.
Or, you can use the following example, and just replace the glyph codes (numbers: f100, f101, f102 etc.) with the ones from your icon set.
Once you have the files, please go to \wp-content\themes\your-child-theme-name\fonts folder (if there is none, create fonts folder in your child theme), on your server, and create a new folder, in the fonts folder. Name it as you named your icons (MyIcon).
The new fonts folder should contain .ttf and .woff files, and php file.
5. Copy and edit theme files - Step 01:
Copy admin-style.php file, from your main theme's root folder to your child theme's root folder \wp-content\themes\your-child-theme-name, remove the following line of code, which is located at the end:
Replace every occurrence of 'MyIcon' / 'myicon' with the name of your icons (if you didn't name them MyIcon).
5. Copy and edit theme files - Step 02:
Copy icons.php file, from your main theme's root folder to your child theme's root folder \wp-content\themes\your-theme-name folder, remove the following line of code, which is located at the end:
Replace every occurrence of 'MyIcon' / 'myicon' with the name of your icons (if you didn't name them MyIcon).
7. Google Map API Key
*Google has, starting July 16, 2018, made certain API and billing changes. In order to enable billing, you will need to provide credit card or billing account to Google Maps platform. Please note that we are in no way associated with Google Maps and their payment system and for any questions and issues regarding payments and billing you will need to contact them. Please refer to their FAQ and their documentation to learn more about these changes.
In order to be able to fully use all Bello theme's Google Map features, you will need to get an API Key, and then enable four different API services on Google Cloud.
2. Geocoding API - to convert the position by longitude and latitude and calculate distance from the visitor and listing location. This is the process of converting addresses (like "1600 Amphitheatre Parkway, Mountain View, CA") into geographic coordinates (like latitude 37.423021 and longitude -122.083739), which you can use to place markers on a map, or position the map - https://developers.google.com/maps/documentation/geocoding/start.
3. Maps Javascript API - To fully utilize google maps search, customization, etc. It lets you customize maps with your own content and imagery for display on web pages and mobile devices. The Maps JavaScript API features four basic map types (roadmap, satellite, hybrid, and terrain) which you can modify using layers and styles, controls and events, and various services and libraries - https://developers.google.com/maps/documentation/javascript/examples/.
Please refer to these links for preview of each icon set.
10. How do I remove the bar with Total and leave contact form?
Since plugin version 2.2.1 it is possible to remove total bar in Cost Calculator general settings panel.
*Note that this does not remove total price from the email users will receive.
11. Installing Demo Content
The best way to start is to install demo content. If you want to install demo content please do the following:
First, delete all sample content (posts and pages) which is automatically created when
WordPress is installed. If you have already added a new content, please make sure to do the backup in order to save the content. After the backup, delete all content and you can start with the next steps:
1. Start with fresh WordPress installation and delete all sample content (like posts and pages) which is automatically created when WordPress is installed.
2. Go to ‘Tools > Import > WordPress’ and install WordPress Importer plugin if it is not already installed.
3. When it is installed, choose xml file from demo_data folder and click ‘Upload file and import’. On the following screen make sure that ‘Download and import file attachments’ is checked. Click ‘Submit’ button and wait until import is finished.
If import appears broken, please delete any imported menus from Appearance > Menus and repeat the import. Do the same again if necessary (e.g. 5-10 times) until import is completed.
Additionally, because import process depends on server setup, you may ask your hosting provider for help.
12. How to make a page load with accordion items closed by default
In order to make a page load with accordions collapse by default, please edit cargo/bt_elements.js file in your wp-content/plugins folder and locate the following statements:
$( '.tabsVertical' ).each(function(){
 $( this ).find( '.tabAccordionTitle' ).first().click();
 });
Remove these statements from file or comment them out and your accordions will remain closed on page load.
13. How to increase the size of the logo?
In order to increase size of the logo you need to add the following CSS statements to Custom CSS field of Appearance > Customize > General panel:
Please adjust the numbers according to your needs. The first number (50px) represents the height of the logo and the second (15px) represents the top margin between the header widget elements and content.
14. Is there some way I can see all the icons of Hotel California theme?
Please refer to these links for preview of each icon set.
15. How to install AIKO plugin?
There are two methods of installing a plugin onto your WordPress site. You can use the WordPress Admin panel to upload and install the plugin, or you can use FTP software instead.
WordPress Plugin Installation
To install the plugin directly from the WordPress admin panel, please first log-in to your wp-admin console.
Navigate to Plugins > Add New,
Click Upload Plugin,
Click Choose File.
If you want to upload in admin panel, you need to extract plugin folder (aiko-developer folder) from downloaded code-canyon.zip folder, pack it again as zip, and then upload that zip.
Click Install Now and the installation will begin.
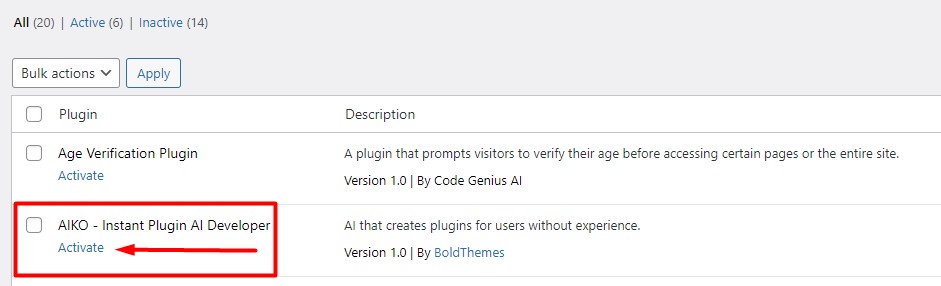
Once the installation is complete, go to Plugins screen and look for the newly uploaded AIKO – Instant Plugin AI Developer in the list.
Click Activate to activate it.
FTP Installation
To install the plugin using FTP software, log in to the server where your WordPress website is hosted. First extract aiko-developer folder from downloaded .zip file from CodeCanyon.
Now connect to your server via FTP and navigate to the wp-content/plugins folder in your WordPress directory online. Upload aiko-developer folder.
Once the plugin is uploaded, you need to activate it. Go to ‘Plugins > Installed Plugins’, find AIKO – Instant Plugin AI Developer and click ‘Activate’ button.
16. How to install Hero Products plugin
There are two methods of installing a plugin onto your WordPress site. You can use the WordPress Admin panel to upload and install the plugin, or you can use FTP software instead.
WordPress Plugin Installation
To install the plugin directly from the WordPress admin panel, please first log-in to your wp-admin console.
Navigate to Plugins > Add New,
Click Upload Plugin,
Click Choose File.
If you want to upload in admin panel, you need to extract plugin folder (hero-products folder), from downloaded hero-products.zip file and pack it again as zip and then upload that zip.
Click Install Now and the installation will begin.
Once the installation is complete, go to Plugins screen and look for the newly uploaded Hero Products in the list.
Click Activate to activate it.
FTP Installation
To install the plugin using FTP software, log in to the server where your WordPress website is hosted.
First extract hero-products folder from downloaded hero-products.zip file.
Now connect to your server via FTP and navigate to the wp-content/plugins folder in your WordPress directory online. Upload hero-products folder to the plugins’ folder on your remote server.
Once the plugin is uploaded, you need to activate it. Go to ‘Plugins > Installed Plugins’, find Hero Products and click ‘Activate’ button.
17. How to install Cost Calculator plugin?
There are two methods of installing a plugin onto your WordPress site. You can use the WordPress Admin panel to upload and install the plugin, or you can use FTP software instead.
WordPress Plugin Installation
To install the plugin directly from the WordPress admin panel, please first log-in to your wp-admin console.
Navigate to Plugins > Add New,
Click Upload Plugin,
Click Choose File.
If you want to upload in admin panel, you need to extract plugin folder (bt_cost_calculator folder), from downloaded bt_cost_calculator.zip file and pack it again as zip and then upload that zip.
Click Install Now and the installation will begin.
Once the installation is complete, go to Plugins screen and look for the newly uploaded Cost Calculator in the list.
Click Activate to activate it.
FTP Installation
To install the plugin using FTP software, log in to the server where your WordPress website is hosted. First extract bt_cost_calculator folder from downloaded bt_cost_calculator.zip file.
Now connect to your server via FTP and navigate to the wp-content/plugins folder in your WordPress directory online. Upload bt_cost_calculator folder to the plugins’ folder on your remote server.
Once the plugin is uploaded, you need to activate it. Go to ‘Plugins > Installed Plugins’, find Cost Calculator and click ‘Activate’ button.
18. Installing OpenGraphiq plugin
There are two methods of installing a plugin onto your WordPress site. You can use the WordPress Admin panel to upload and install the plugin, or you can use FTP software instead.
WordPress Plugin Installation
To install the plugin directly from the WordPress admin panel, please first log-in to your wp-admin console.
Navigate to Plugins > Add New,
Click Upload Plugin,
Click Choose File.
If you want to upload the plugin in admin panel, you need to upload installable plugin .zip file, downloaded from your the Downloads section of your profile on CodeCanyon.
Click Install Now and the installation will begin.
Once the installation is complete, go to Plugins screen and look for the newly uploaded OpenGraphiq in the list.
Click Activate to activate it.
FTP Installation
To install the plugin using FTP software, log in to the server where your WordPress website is hosted. First extract opengraphiq folder from downloaded .zip file from CodeCanyon.
Now connect to your server via FTP and navigate to the wp-content/plugins folder in your WordPress directory online. Upload opengraphiq folder from any of the available plugin .zip packages downloaded from CodeCanyon to the plugins’ folder on your remote server.
Once the plugin is uploaded, you need to activate it. Go to ‘Plugins > Installed Plugins’, find OpenGraphiq and click ‘Activate’ button.
19. How to create One page site?
In order to create one page site, please follow the instructions below:
1. First, navigate to the Bold Builder edit panel and edit desired section. Add any ID (we recommend it to contain only letters, and not any additional signs) to the section in Custom Tab, Element ID field:
2. Then in Appearance > Menus add a new Custom Link and as a URL insert custom ID atribute with #.
The best way to start is to install demo content. If you want to install demo content please do the following:
Go to ‘Tools > Import > WordPress’ and install WordPress Importer plugin if it is not already installed.
When it is installed, choose xml file from demo_data folder and click ‘Upload file and import’. On the following screen make sure that ‘Download and import file attachments’ is checked. Click ‘Submit’ button and wait until import is finished.
You should see imported demo calculators in Cost Calculator panel.
21. How can I change total format’s display?
Since version 2.1.6. total format can be changed in Cost Calculator Settings panel.
22. How to change the e-mail address from Wordpress?
In order to change the sender name, if the visitor and admin are receiving an e-mail from "Wordpress", we suggest you to avoid code customization and to install a third party plugin which will allow this. For example this one: WP Simple Mail Sender.
23. How to make a page load with accordion items closed by default
In order to make a page load with accordions collapsed by default, please edit medicare/bt_elements.js file in your wp-content/plugins folder and locate the following statements:
$( '.tabsVertical' ).each(function(){
 $( this ).find( '.tabAccordionTitle' ).first().click();
 });
Remove these statements from file or comment them out and your accordions will remain closed on page load.
24. "404 Page not found" error on inner pages
If after installing demo content inner pages are returning "404 Page not found" error, please try to recreate permalink structure by going to Settings > Permalinks, changing it to Post name, for example, saving the settings, then changing it back to the one you originally had, and saving it again.
25. Installing Demo Content
The best way to start is to install demo content. If you want to install demo content please do the following:
First, delete all sample content (posts and pages) which is automatically created when WordPress is installed. If you have already added a new content, please make sure to do the backup in order to save the content. After the backup, delete all content and you can start with the next steps:
1. Start with fresh WordPress installation and make sure that theme and required plugins
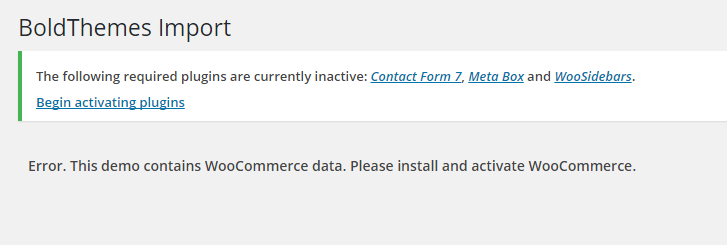
are installed. Since some demos contain WooCommerce data, please install WooCommerce
plugin. Once you finish with the installation, you can remove WooCommerce plugin if you do not need it.
2. Go to ‘Tools > BT Import’ and select demo which you want to install.
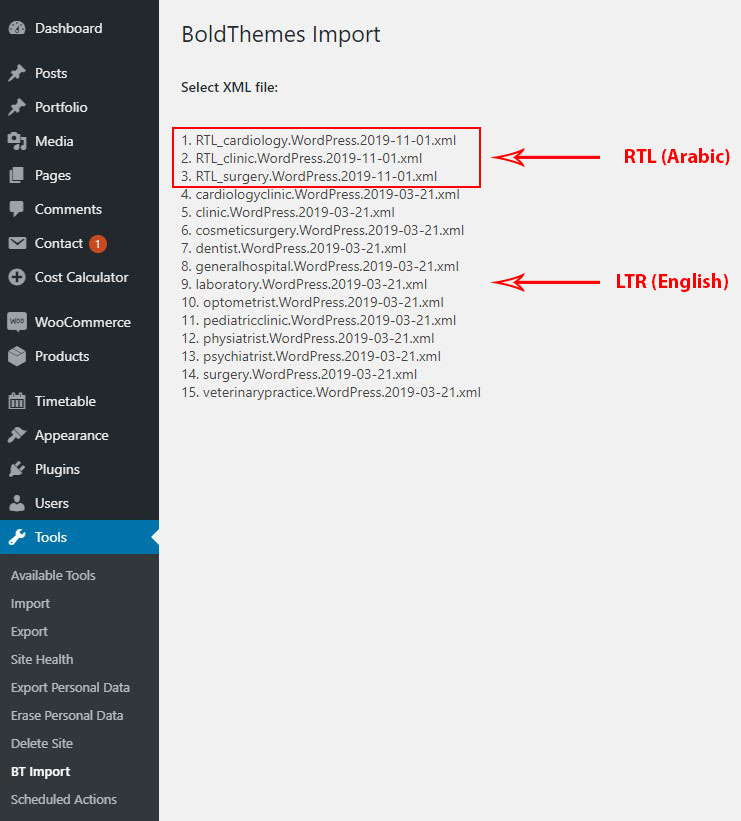
*Make sure that you select demo in correct language – there are three RTL demos in Arabic, and the rest are LTR in English.
3. Wait until you get message that import is finished. If you see red colored error message, just repeat the import until you get the message that import is finished. Import is incremental process and will finish eventually.
4. If you have imported demo with WooCommerce content, go to WooCommerce > Settings > Products > Display and select Shop as Shop Page; open Checkout tab and
select Cart as Cart Page and Checkout as Checkout Page; open Accounts tab and select My Account as My Account Page.
Check our video tutorial how to install theme and import demo content.
In order to increase size of the logo you need to add the following CSS statements to Custom CSS field of Appearance > Customize > General panel:
.btLogoArea .logo span a img {
    max-width: 200px;
}
Please adjust the numbers according to your needs.
27. How to create One page?
The best way to start is to install demo content. If you want to install one page demo please refer to the article: Installing Demo Content. You will be able to see how all elements on the single page are set.
Please have a look at the following steps, in order to set up one pager:
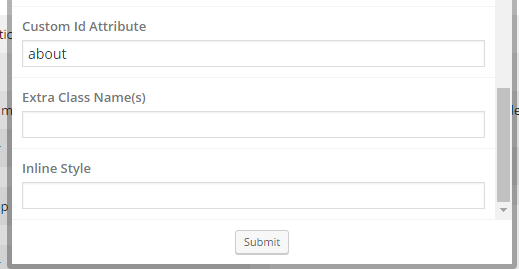
1. Insert Custom ID Attribute for the desired section element.
2. Then in Appearance > Menus add a new custom link and as a URL insert custom ID attribute with #.
Please note that our two premium plugins, Cost Calculator and Bold Timeline, come bundled with the theme and therefor don't have separate purchase codes.
Although newer versions of the two plugins have product license panel for entering purchase code, this will only work when they are purchased separately, not when they come bundled with the theme.
Note that you are not required to purchase them separately if you are using one of our themes, and you shouldn't enter theme's purchase code.
The only purpose of the product license is to allow people to update plugins through wp-admin panel, but since you got them together with the theme you will get the necessary updates with new theme versions.
You can find more information on bundled plugins on the following link.
30. How to set initial value for Switch item to True?
From Cost Calculator Version 1.2.1, initial value can be set in Cost Calculator Item Settings.
In order to set initial value for Switch item, you need to add 'On' value to 'Initial value' field.
For example, if 'On' value is 1, you should add number 1 to the field.
31. I have purchased your theme. Now what?
The best starting point is to go through the provided documentation.
It will guide your through the common tasks of theme installation and import of demo content.
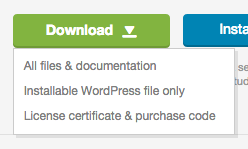
You have 2 options for downloading your theme:
Installable WordPress file only.
All files and documentation (full zip folder).
Documentation pdf is in the All files and documentation package. Please download it and the document should be in the root of the downloaded archive.
32. I want to change the position of section's background image on mobile resolutions so users do not see the center part of the image. How can I do that?
In order to offset the image on mobile resolutions and put some other part of the image in focus instead of center area which is displayed by default, please use the following approach:
Add Custom Id to desired section (mysection_1 for example):
And then add the following css statements to Appearance > Customize > General, Custom CSS field:
Please refer to these links for preview of each icon set.
34. How to translate plugin?
The procedure is standard – you can find the .pot file in the plugin’s languages folder.
Please use PoEdit to translate the .pot file and create respective .po and .mo fies.
You should upload .po and .mo files created using PoEdit back to plugin’s languages folder.
Please name .po and .mo files for example: bold-timeline-nl_NL.po and bold-timeline-nl_NL.mo (nl_NL is the language code for dutch) and place them in /wp-content/plugins/bold-timeline/languages/.
For other languages code, please refer to the following link: Internationalization.
You can set the site language of your WordPress installation on Settings > General. WordPress will automatically use the right language files if they exist.
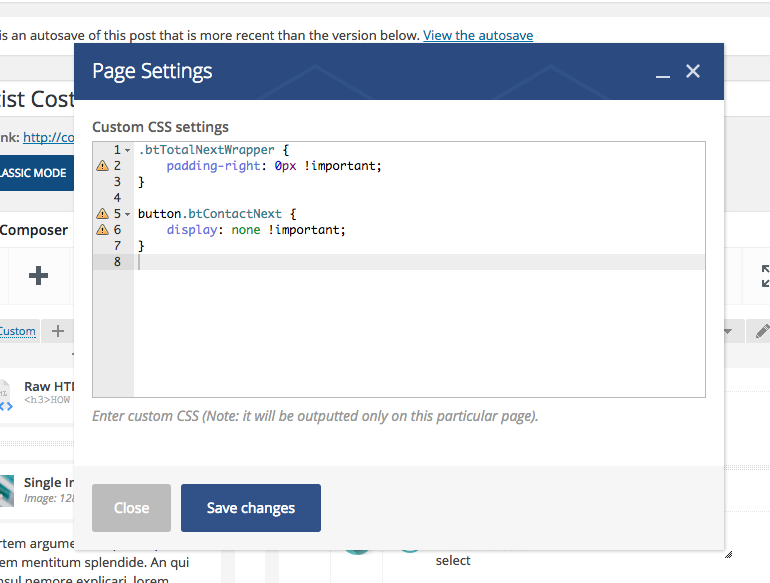
35. I want to add custom CSS statements to style my calculator. Where should I add them?
Custom CSS code should be added to your theme's Custom / Additional CSS field.
If you use WP Bakery Page Builder (former Visual Composer) you should click on Page Settings button in the upper right corner of WP Bakery Page Builder's interface on relevant Page Edit Form:
Alternatively, you can use third party plugin, e.g. Simple Custom CSS.
36. How to set initial value for Text item?
From Cost Calculator Version 1.2.1, initial value can be set in Cost Calculator Item Settings.
In order to set initial value for Text item, you need to add the starting value you want to 'Initial value' field.
Have a look how it looks at the frontend:
37. How to change H tag in page headline?
Title in page headline is, by default, set to use h1 tag.
In order to change the tag, you will need to customize part of the theme's code, so some familiarity with PHP is necessary.
First, install and activate the child theme. Then, to child theme's functions.php file add the following code, and edit the H tag according to your needs:
38. How to make a page load with accordion items closed by default
In order to make a page load with accordions collapse by default, please edit celebration/bt_elements.js file in your wp-content/plugins folder and locate the following statements:
$( '.tabsVertical' ).each(function(){
 $( this ).find( '.tabAccordionTitle' ).first().click();
 });
Remove these statements from file or comment them out and your accordions will remain closed on page load.
39. Is there some way I can see all the icons of Finance theme?
Please refer to these links for preview of each icon set.
40. How to install Bold Timeline plugin?
There are two methods of installing a plugin onto your WordPress site. You can use the WordPress Admin panel to upload and install the plugin, or you can use FTP software instead.
WordPress Plugin Installation
To install the plugin directly from the WordPress admin panel, please first log-in to your wp-admin console.
Navigate to Plugins > Add New,
Click Upload Plugin,
Click Choose File.
If you want to upload in admin panel, you need to extract plugin folder (bold-timeline folder), from downloaded bold-timeline.zip file and pack it again as zip and then upload that zip.
Click Install Now and the installation will begin.
Once the installation is complete, go to Plugins screen and look for the newly uploaded Bold Timeline in the list.
Click Activate to activate it.
FTP Installation
To install the plugin using FTP software, log in to the server where your WordPress website is hosted. First extract bold-timeline folder from downloaded bold-timeline.zip file.
Now connect to your server via FTP and navigate to the wp-content/plugins folder in your WordPress directory online. Upload bold-timeline folder to the plugins’ folder on your remote server.
Once the plugin is uploaded, you need to activate it. Go to ‘Plugins > Installed Plugins’, find Bold Timeline and click ‘Activate’ button.
41. SVG Image format
Our themes currently do not support SVG image format. We also don't recommend using any of the plugins for SVG, such as SVG Support, Safe SVG, and others.
These plugins have not been tested with the themes, are not fully supported, and can cause themes' functionalities, such as Customize panel, to break.
42. How to set Event week view?
Kids Club and Fitness Club themes use Events Calendar third party plugin for events list appearance.
From versions 1.0.4 - Kids Club and Fitness Club themes include Events week view element on Bold Builder page editor which contains several settings (Date, Number of events, week day format etc.) in order to illustrate week view.
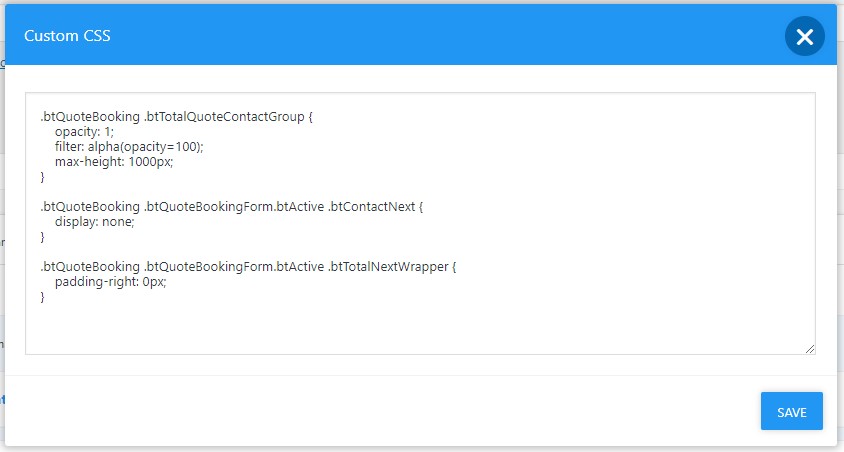
Since plugin version 2.1.9, it is possible to display contact form below total bar by selecting 'Contact Form Initially Visible (Remove Next Button)' field in Cost Calculator settings panel, Contact form tab.
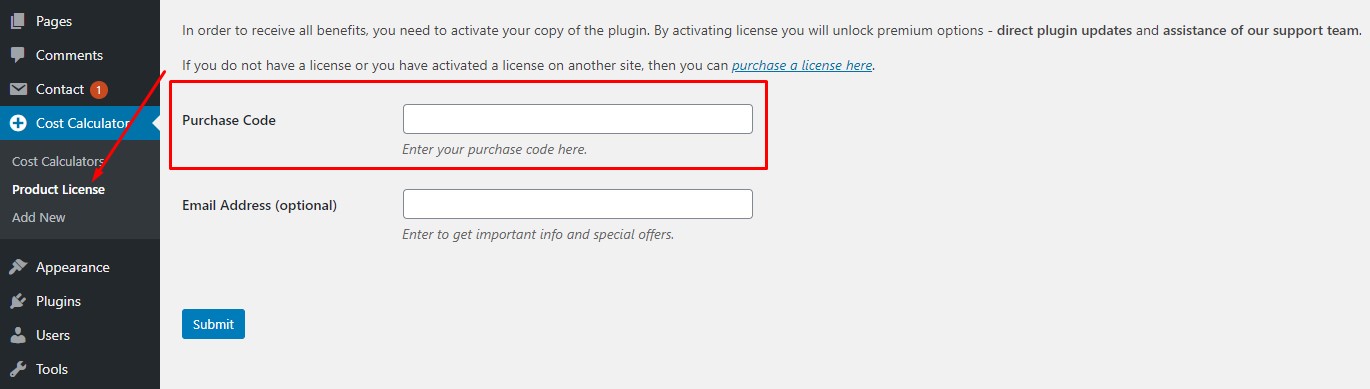
44. Cost Calculator purchase code
Please note that our premium plugin, Cost Calculator, comes bundled with the theme and therefor doesn't have separate purchase code.
Although newer versions of the plugin have product license panel for entering purchase code, this will only work when it's purchased separately, not when it comes bundled with the theme.
Note that you are not requiredto purchase the plugin separately if you are using one of our themes, and you shouldn't enter theme's purchase code.
The only purpose of the product license is to allow people to update plugin through wp-admin panel, but since you got it together with the theme you will get the necessary updates with new theme versions.
You can find more information on bundled plugins on the following link.
45. Is there some way I can see all the icons of Medicare theme?
Please refer to these links for preview of each icon set.
46. How to add custom icons?
Please refer to the instruction below on how to add custom icons to your theme:
1. Create icon folder (e.g. MyIcon) with required fields:
Make sure that your icon folder contains .ttf and .woff files, as well as CSS file with icons' names and glyph codes. If it doesn't have these files, you could use IcoMoon to generate the files.
2. Create PHP file for your icons:
The PHP file should be named as the icons (for example, MyIcon). As an example of how the PHP file should look, you can use one of the existing fonts and copy their files' content, and replace it with your glyph codes.
Or, you can use the following example, and just replace the glyph codes (numbers: f100, f101, f102 etc.) with the ones from your icon set.
Once you have the files, please go to \wp-content\themes\your-theme-name\fonts folder, on your server, and create a new folder, in the fonts folder, and name it as you named your icons (MyIcon). The new fonts folder should contain .ttf and .woff files, and php file.
4. Edit theme files - Step 01:
In admin-style.php file, in \wp-content\themes\your-theme-name folder, remove the following line of code, which is located at the end:
Replace every occurrence of 'MyIcon' / 'myicon' with the name of your icons (if you didn't name them MyIcon).
47. How to translate theme?
In order to translate the theme, please follow the next steps:
Theme's .pot file is located in /wp-content/themes/your-theme-name/languages folder.
Please use PoEdit - https://poedit.net/ to translate the .pot file and create respective .po and .mo files.
Please name .po and .mo files e.g. potname-nl_NL.po and potname-nl_NL.mo (nl_NL is the language code for dutch and potname is the name of the .pot file you have started from - it corresponds to text domain of the theme). For other languages' codes, please refer to the following link: Internationalization.
In order to place .po and .mo files properly and not have them deleted when you update the theme, upload them to \wp-content\languages\themes folder. If you don’t have languages folder in your wp-content directory, please proceed and create one. Then create themes folder, and paste the files in it.
Alternatively, you can upload the .po and .mo files to your theme's /wp-content/themes/your-theme-name/languages folder. In that case name them only using the language code (for example nl_NL.mo and nl_NL.po)
Also make sure to translate the theme's plugin .pot file, located in \wp-content\plugins\your-theme-name\languages folder.
The steps are the same as for the theme, except the files should be named bt_plugin-nl_NL.po and bt_plugin-nl_NL.mo (with appropriate language code).
For plugin’s .po and .mo files, you should place them in \wp-content\languages\plugins folder.
You can set the site language of your WordPress installation on Settings > General. WordPress will automatically use the right language files if they exist.
48. Missing Google API key - Google Map
*Google has, starting July 16, 2018, made certain API and billing changes. In order to enable billing, you will need to provide credit card or billing account to Google Maps platform. Please note that we are in no way associated with Google Maps and their payment system and for any questions and issues regarding payments and billing you will need to contact them. Please refer to their FAQ and their documentation to learn more about these changes.
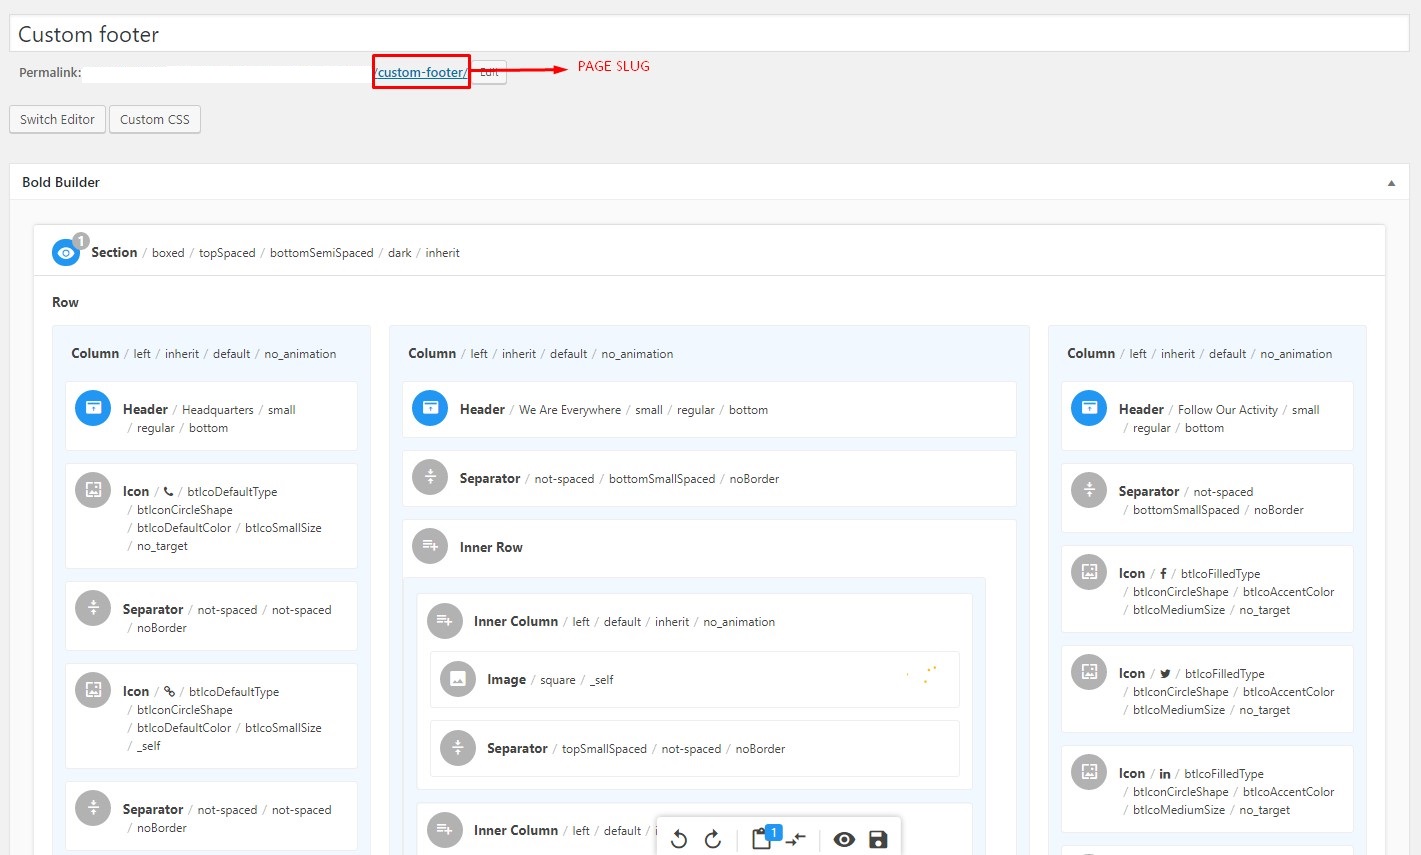
On Appearance > Customize > Header and Footer panel there is a Footer Page Slug.
This field should contain the slug of the page which serves as a template for footer area. All pages inherits settings, elements and shortcodes of the page referenced via this field.
In order to change elements in footer, please locate the page (on all pages list) with the slug entered in Footer Page Slug field and edit it.
50. Will I loose content when updating the plugin?
With new plugin update you will not loose any content, but it will affect and overwrite any changes in the bt_cost_calculator.php code that you've made. The best way is to manually repeat modifications with new update.
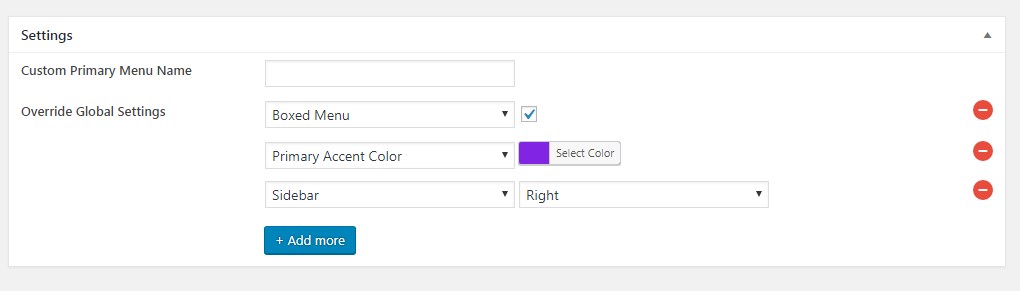
51. How to change the settings only on one page?
Here is how the Setting generally works:
The settingsin the Appearance > Customize panel are global, meaning that they influence every page on the site by default.
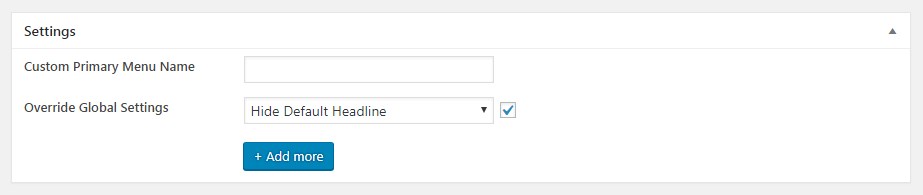
On the other hand, you have an option to override these settings on per page basis. If you take a look at the bottom of the page edit form, you will notice 'Override Global Setting' part inSettings Section - here you can override global settings for every page.
So, for example, if you need to change the logo then the value should be either absolute URL of the image or image ID from Media Library. The same is with Sidebar (left, right or no sidebar) or Boxed menu (true or false) etc.
From Cost Calculator Version 1.2.1, initial value can be set in Cost Calculator Item Settings.
In order to set initial value for Select item, you need to add the index of the item you want to display as initial, in 'Initial select list index' field.
For example, if you have three items in Select field, and you want the second one to be initial, you would add number 2 to the field.
53. Generate API Key / Select AI Model
Once you activate the plugin, you will see its edit panel on your dashboard. Click on the 'Settings' first.
First step is to generate an API Key. Here is the link where you can create your account and generate API key – https://platform.openai.com/api-keys.
PLEASE NOTE: OpenAI is not free and you will be required to provide your credit card information. We are not associated with them and their payment system, and for any questions and issues regarding payments and billing you will need to contact OpenAI support.
Next, you need to select AI Models you want to use. On this link you can find more detailed explanation of each of the available models – https://platform.openai.com/docs/models.
54. Is there some way I can see all the icons of Craft Portfolio theme?
Please refer to these links for preview of each icon set.
55. How to update plugin?
In order to update AIKO to the latest version download the plugin folder from the download section of your CodeCanyon profile and update through FTP. We suggest that you use Filezilla to access your server. Here is the article that explains how Filezilla works.
Extract aiko-developer file from the folder you downloaded, and upload it to /wp-content/plugins/ folder of your WordPress installation. You will be prompted to overwrite the existing files. Select ‘Yes’, and the plugin will update.
Other option is to update it through wp-admin panel. Go to Plugins >Add New, and upload aiko-developer zipped folder. You will be asked to replace existing version with the newly uploaded. Select ‘Yes’, and the plugin will update.
If you have made some changes in the plugin’s code, you will need to reapply the changes in the new version.
Custom plugins that were made before update will be preserved.
56. I want to use a child theme. How can I do that?
If you want to use a child theme, please follow these steps:
First of all, make sure that you haven’t changed the parent theme’s folder name. It needs to remain the same.
You should be able to find the folder your_theme_name-child in the package you've downloaded from ThemeForest.
Please copy this folder to /wp-content/themes folder on your server.
Go to Appearance > Themes in your wp-admin console and activate child theme. Please have in mind that all required plugins need to be activated.
To replace a function, copy it from the parent theme to the functions.php file in your child theme and make your modifications.
For example, if you want to change default pagination HTML output, you need to copy entire function to the child theme:
/**
 * Pagination output for post archive
 */
if ( ! function_exists( 'boldthemes_pagination' ) ) {
    function boldthemes_pagination() {
        ...
    }
}
And then replace the output according to your needs. For example
if ( ! function_exists( 'boldthemes_pagination' ) ) {
    function boldthemes_pagination() {
        echo '<div class="new-archive-pagination"></div>;
    }
}
Please note that this is an example for one function, and it might differ for other functions and changes.
You can find additional info in this article from EnvatoTuts+.
57. How to increase the size of the logo?
In order to increase size of the logo you need to add the following CSS statements to Custom CSS field of Appearance > Customize > General panel:
Please adjust the numbers according to your needs. The first number (100px) represents the height of the logo and the second (20px) represents the top and bottom margins between the viewport's top and the content.
58. Issues with Grid layout
If you have activated the theme with the existing content, you will have problems with grid layout.
Once it's activated, our theme generates necessary thumbnails for every newly uploaded image. Since these were uploaded prior to activation of the theme, thumbnails do not exist yet.
In order to correct this, please install the following plugin: Regenerate Thumbnails and run it. Once you do that, all necessary thumbnails will be regenerated and the issue should be resolved. All newly uploaded photos will be ok.
59. How to make a page load with accordion items closed by default
In order to make a page load with accordions collapse by default, please edit reconstruction/bt_elements.js file in your wp-content/plugins folder and locate the following statements:
$( '.tabsVertical' ).each(function(){
 $( this ).find( '.tabAccordionTitle' ).first().click();
 });
Remove these statements from file or comment them out and your accordions will remain closed on page load.
60. How to edit 404 page?
The 404 error page can be customized by editing 404.php file in /wp-content/themes/your-theme/ folder.
There you can edit text, button (on some themes), or images.
In order to replace the background image on error page, please follow these steps:
1. First upload your image to /wp-content/themes/your-theme/gfx folder.
by changing the existing name of the image to that of your image.
Please note that the code might look a bit different than the example above, depending on which theme you are using.
Additionally, making larger changes to the structure of the page (code) falls under 'customization per request', so we can't assist with that type of edits.
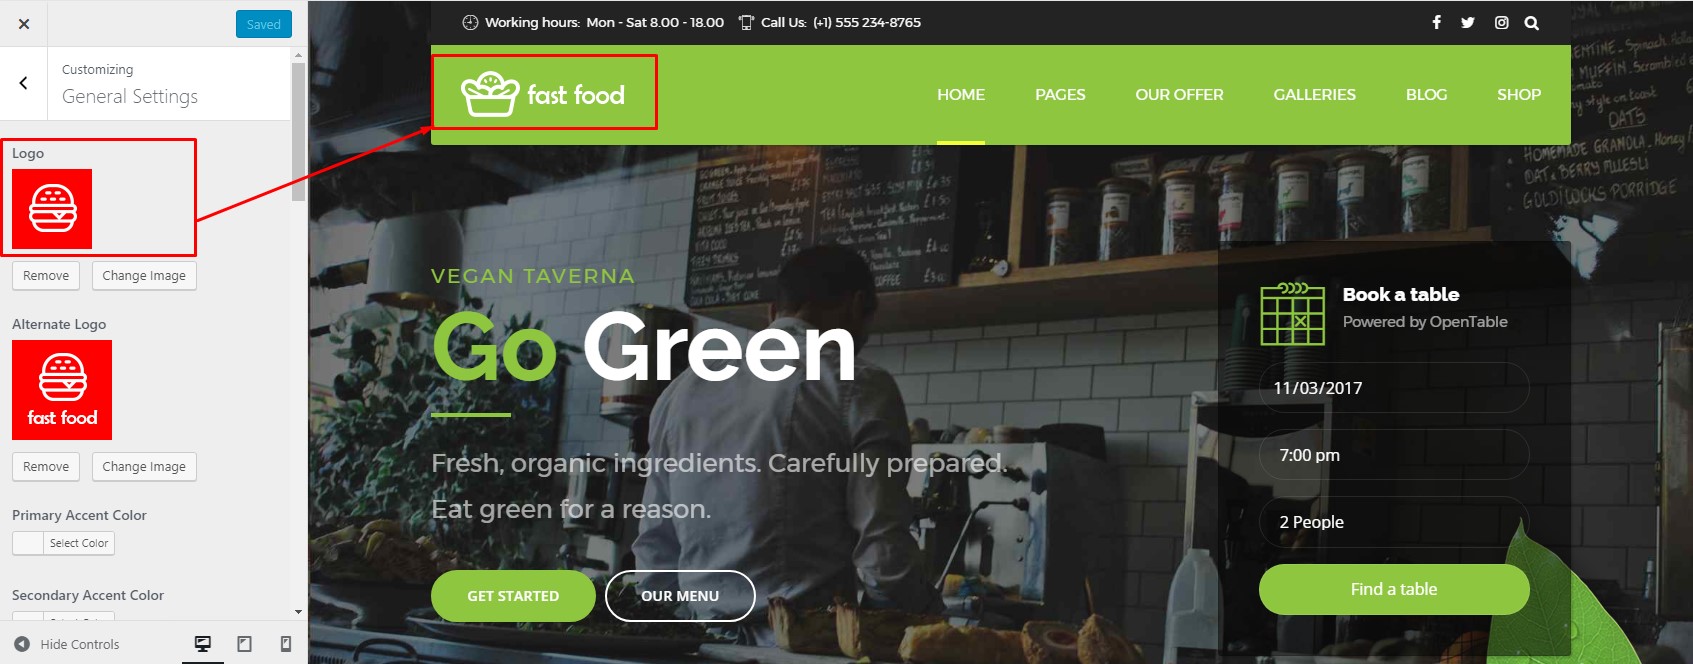
61. How to change logo?
The logo (and alternate logo) should be set in Appearance > Customize > General Settings panel. If, after setting your logo, it's still not visible on some pages, please do the following steps (note: example on Fast Food theme):
1. Navigate to the those pages' editor.
2. Locate Override Global Settings section at the bottom of the Page editor end remove Logo or Alternate logo:
Once you add titles with Yoast SEO plugin, header will display that title and site name, instead of the page title.
In order to show only title, without site name, you could change page title template to display only the title. In Yoast > Titles & Metas > Pages Title template, you could add title template as:
%%title%%
Other option would be to switch to All in One SEO Pack plugin, that does not affect header title.
63. How to add custom Icon Font to Bold Timeline
Please refer to the instruction below on how to add custom icons to Bold Timeline:
1. Copy the font files to /assets/fonts/
Make sure that your icon files contains .ttf and .woff files, as well as CSS file with icons' names and glyph codes. If it doesn't have these files, you could use IcoMoon to generate the files.
2. Create PHP file for your icons:
Usually you will name PHP file as the icons (for example, MyIcon.php) and saved to /assets/php/ . As an example of how the PHP file should look, you can use one of the existing fonts and copy their files' content, and replace it with your glyph codes. Make sure to rename the function name in the file in line with the name of your icon set (for example function my_custom_icons())
The glyph codes are defined in style.css file (located in downloaded file from e.g. IcoMoon). Here is the example:
needs to be added for every glyph and string fa5b needs to be replaced with the respective hex code
5. Add custom Admin CSS:
Finally you need to add the following statements to your admin theme css (or plugin's style-admin.css file) in order to display the proper icons in the icon selection control:
In order to add new Font icons, you should customize the theme. Please do the following steps:
1. First of all you need to import your font file. You will need to import .eot, .svg, .ttf, and .woff files of your font, and name them the same. For example 'myFont'. Files need to be added to \wp-content\themes\your-theme-name\fonts folder.
2. Please take a look at the top of style.crush.css (or style.css) file and you will find @font-face declaration. You need to import your own font files in the same manner as FontAwesome for example, and declare the font-family as 'myFont' or any name you used for your font (*note that it has to be the same name you used for files).
3. Then you need to search for 'data-ico-fa' in the style.crush.css (or style.css) file and create respective statements for your font.
*Please note that mf stands for the name of the font (in our example myFont), so if you named your font differently, you need to use acronym that matches your font's name. This refers to all the code that is added for new icons, as well as file names.
4. Then, you need to create new file in theme plugin's folder called bt_mf_icons.php. The file should be added to \wp-content\plugins\your-theme-name folder.
As an example of how the PHP file should look, you can use one of the existing fonts (bt_fa_icons.php) and copy their files' content, and replace it with your glyph codes.
Or, you can use the following example, and just replace the glyph codes (numbers: f100, f101, f102 etc.) with the ones from your icon set.
5. Finally, you need to edit php file in your plugin's folder, search for bt_fa_icons() and add respective statements for bt_mf_icons() as well. The file is in \wp-content\plugins\your-theme-name folder (it is the file named as the theme).
*The example is from our Industrial theme but the process is the same for all themes.
*Please note that this is documentation for Bold Builder plugin, and not for the specific theme you are using, so some options (screenshots) might differ, but the process of editing is the same either way.
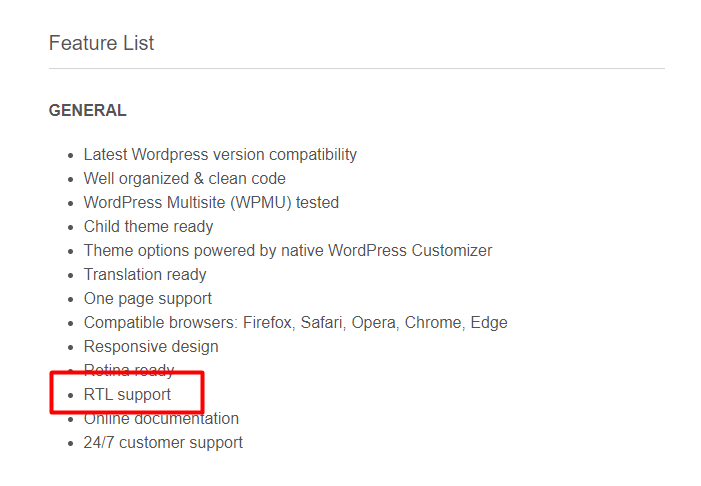
67. RTL Support
In order to ensure that the theme you purchased / want to purchase is RTL supported, you can check on our themes' profiles on ThemeForest.
These themes have CSS defined for RTL layout, so when you change site's language in Settings >General on your dashboard (or via language switch if you have multilingual site), the RTL layout will automatically apply to certain elements.
However!
Some elements in Bold Builder that have alignment option (such as Icons, Images, Columns, etc...) will need to be rearranged manually to fit the RTL layout.
Additionally, some of our themes, such as Medicare and Industrial, come with full, premade RTL demos.
68. How to import premade templates
1. Go to ‘Tools > Import > WordPress’ and install WordPress Importer plugin if it is not already installed.
2. When it is installed, choose xml file from demo folder from plugin package and click ‘Upload file and import’.
3. On the following screen make sure that ‘Download and import file attachments’ is checked. Click ‘Submit’ button and wait until import is finished.
4. Once demo import is done, you should see imported templates in OpenGraphiq panel.
69. How to change the settings only on one page?
Here is how the Setting generally works:
The settingsin the Appearance > Customize panel are global, meaning that they influence every page on the site by default.
On the other hand, you have an option to override these settings on per page basis. If you take a look at the bottom of the page edit form, you will notice 'Override Global Setting' part inSettings Section - here you can override global settings for every page.
So, for example, if you need to change the logo then the value should be either absolute URL of the image or image ID from Media Library. The same is with Sidebar (left, right or no sidebar) or Boxed menu (true or false) etc.
When it comes to editing the Blog Posts, Portfolio projects or Products, than please refer to the articles:
70. I am getting "The Link You Followed Has Expired” Error in WordPress when trying to upload the plugin.
This error usually occurs when you are trying to upload a WordPress theme or a plugin to your website from the WordPress admin area.
WordPress hosting companies have a setting which controls the size of files you can upload from inside the WordPress admin area. They also have a setting which stops scripts from running too long.
Please refer to these links for preview of each icon set.
73. How to choose Home page version?
When you decide which Homepage version you are going to use, then please follow the next steps:
Set your chosen Homepage version as Front page in Settings > Reading Settings panel.
2. In the chosen Homepage editor locate the Override Global Settings – at the bottom of page editor:
3. All the settings (logo, alternate logo, colors, menu type, typography etc.) should be set the same in Customization panel.
Have a look at the following example - copying accent color (note: example is on the Craft Beer theme, but it works the same on all themes):
Once you are done with setting main settings in Customization panel (logo, accent and alternate colors, menu layout etc.) then make sure to edit Primary Menu according to your needs (remove unnecessary Homepages etc.).
In Appearance > Widgets panel you can see the list of available widgets and widget areas.
Here’s how they work - each theme has default widget areas, such as Footer widgets, Header Left widget, Header Right widgets, etc.
Some themes have custom widget areas made for each homepage in order to have different widgets on them.
The purpose of custom widget areas is to override the default widget areas on certain pages.
Custom widget areas are added in Appearance > Sidebars panel, by selecting which default area they will replace and on what page(s) they will display.
Once you select your homepage, go to Appearance > Widgets and check if that homepage has its own custom widget area.
If it does, you have two options – first is to move widgets from this custom widget area to a corresponding default area.
Other solution would be to simply assign that custom widget area to display on all pages by selecting them in Appearance > Sidebars panel.
*Example is from Renata theme, but the steps are the same for all of our themes.
75. How to change the Excerpt text?
All Blog Posts, and even Pages can have Excerpt text.
In order to change the ’Excerpt text’ please take a look at the bottom of edit post page. Since this field is not visible by default, just click Screen options button at top right corner of the form and check Excerpt checkbox.
This will make excerpt field visible. You will be able to edit Excerpt text.
76. How to change the header and edit other Single Shop Product page settings?
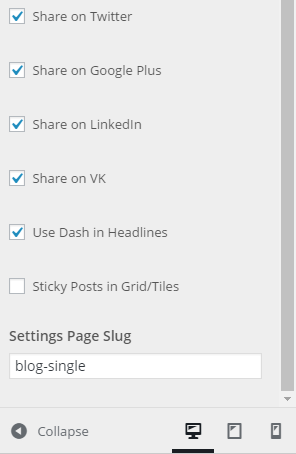
All single product pages inherit the settings from their template page. In order to edit excerpt text and header background image, please locate this page on All Pages list, and proceed to follow instructions from our article.
In order for this page to work as a template page for single products, make sure to add its slug to Settings Page Slug field in Appearance >Customize >Shop panel.
Please refer to these links for preview of each icon set
78. How to edit Footer area on Kids Club theme?
On Appearance > Customize > Header and Footer panel there is a Footer Page Slug.
This field should contain the slug of the page which serves as a template for footer area. All pages inherit settings, elements and shortcodes of the page referenced via this field.
In order to change elements in footer, please locate the page (on all pages list) with the slug entered in Footer Page Slug field and edit it.
Please adjust the numbers according to your needs. The first number (100px) represents the height of the logo and the second (25px) represents the top margin between the logo and viewport's top
80. Missing style sheet error when installing the theme
A common issue that can occur with users new to installing WordPress themes is a "Broken theme and/or stylesheets missing” error message being displayed when trying to upload or activate the theme. This error message does not mean that the theme you have purchased is broken, it simply means it has been uploaded incorrectly.
You have 2 options for downloading your theme:
Installable WordPress file only.
All files and documentation (full zip folder).
Please use Installable WordPress file only archive in the process of Theme installation:
Log in to your WordPress admin area.
Browse to Appearance > Themes.
Click on ‘Add New’.
Click ‘Upload Theme’.
Browse and select the theme zip file to upload, then click 'Install Now' button.
Check our video tutorial how to install theme and import demo content.
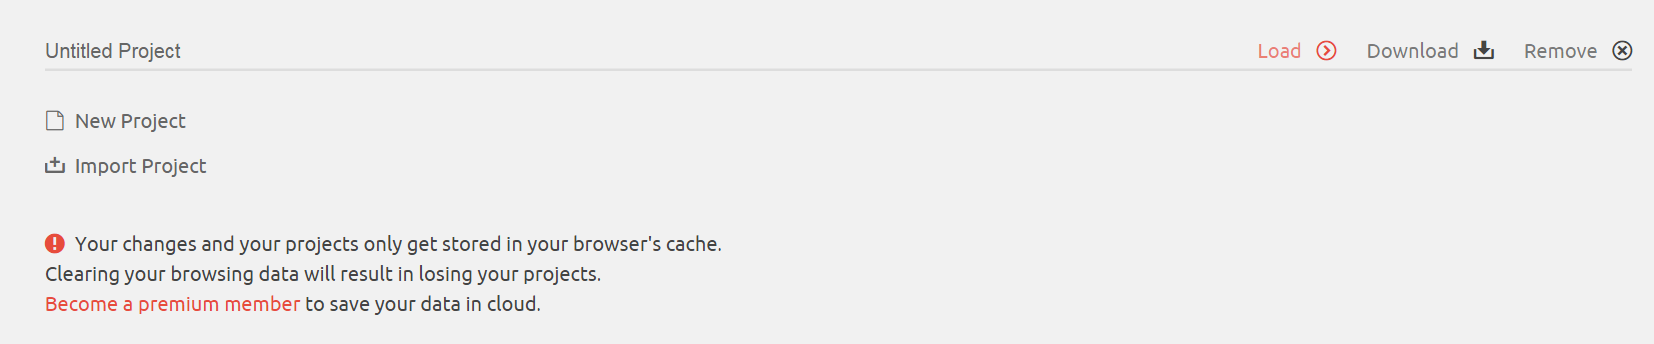
3. Click on hamburger Menu in upper left corner and choose Manage Projects:
4. Click New Project. Rename the project if you want. Click Load:
5. Click Import Icons:
6. Choose your .svg file.
7. If asked do you want to use font's metrics click "Yes".
8. Click on hamburger Menu in upper right corner and click Select all.
9. Click Generate font in lower left corner:
10. Click Preferences and set fontawesome-webfont for Font Name:
11. Click Download in lower right corner:
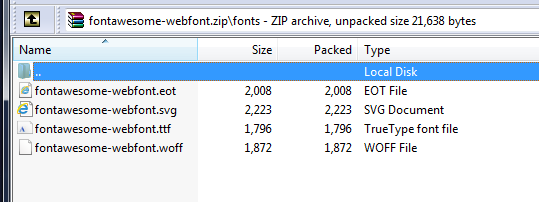
12. Extract files from the downloaded archive's fonts folder:
13. Locate the font folder in theme's folder on your server and delete everything that has fontawesome in the name including woff2 and oet file.
14. At the end, upload newly created files from IcoMoon.
83. How to translate plugin?
The procedure is standard – you can find the .pot file in the plugin’s languages folder.
Please use PoEdit to translate the .pot file and create respective .po and .mo files.
You should upload .po and .mo files created using PoEdit back to plugin’s languages folder.
Please name .po and .mo files for example: aiko-developer-nl_NL.po and aiko-developer-nl_NL.mo (nl_NL is the language code for Dutch) and place them in /wp-content/plugins/aiko-developer/languages/ folder.
For other languages code, please refer to the following link: Internationalization.
You can set the site language of your WordPress installation on Settings > General. WordPress will automatically use the right language files if they exist.
84. How to make a page load with accordion items closed by default
In order to make a page load with accordions collapse by default, please edit showcase/bt_elements.js file in your wp-content/plugins folder and locate the following statements:
$( '.tabsVertical' ).each(function(){
 $( this ).find( '.tabAccordionTitle' ).first().click();
 });
Remove these statements from file or comment them out and your accordions will remain closed on page load.
85. How to disable Overlay Grid Lines?
In order to disable Overlay Grid Lines, please navigate to the Appearance > Customization > General Settings and choose No Lines from the dropdown.
86. How to add additional fields to contact form part of Cost Calculator?
If you like to add additional fields to contact form part of Cost Calculator, please do the following:
1. Open bt_cost_calculator.php file in the code editor.
This will create the new field in the form with the placeholder text myText. Change it according to your needs (edit placeholder="' . __( 'myText', 'bt_plugin' ) statement)
3. Locate the following piece of code in cc.main.js file:
'message' : c.find( '.btContactMessage' ).val()
and add above it the following:
'mytext' : c.find( '.myText' ).val(),
it will ensure that the value of the newly created field gets propagated to backend upon form submission
4. Locate the following piece of code in bt_cost_calculator.php file:
$message = $_POST['message'];
and add above it the following:
$mytext = $_POST['mytext'];
5. Locate the following piece of code in bt_cost_calculator.php file:
It will include the value of your field into the email body.
87. How to hide hover image effect?
In order to hide the hover effect on images, please add the Extra Class Name(s) "btSimpleHover" to the required element (Row, Grid gallery or Image etc.):
and then add the following css statements to the Custom CSS field in Customize > General Settings:
.btSimpleHover .captionPane {
    display: none;
}
88. AI Feature
Starting with Bold Builder version 4.7.0 it is possible to use OpenAI API to generate content for specific elements.
This feature is available on themes starting from Law Firm to newer ones.
The elements that can be edited using AI Generator are Headline, Service, and Text.
*Please note that on some themes Headline and / or Service elements cannot be edited with AI Generator at the moment. This feature will be then added in future theme updates.
89. How to make a page load with accordion items closed by default
In order to make a page load with accordions collapse by default, please edit eventim/bt_elements.js file in your wp-content/plugins folder and locate the following statements:
$( '.tabsVertical' ).each(function(){
 $( this ).find( '.tabAccordionTitle' ).first().click();
 });
Remove these statements from file or comment them out and your accordions will remain closed on page load.
90. How to increase the size of the logo?
In order to increase size of the logo you need to add the following CSS statements to Custom CSS field of Appearance > Customize > General panel:
.btLogoArea .logo img {
 height: 56px;
}
Please adjust the numbers according to your needs.
91. Installing Plugins
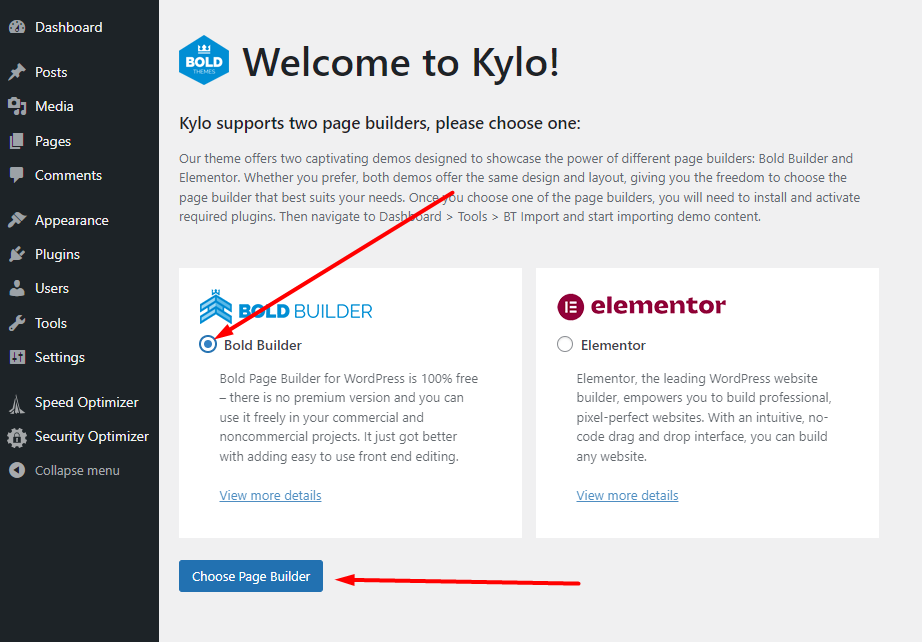
Upon installing and activating theme, in Appearance > Themes panel, you will first be redirected to the page to select if you want to use demo with Bold Builder page editor, or with Elementor page editor.
Select the demo you want to use and click on ‘Choose Page Builder‘ button.
Note: If you clicked on the wrong page builder demo, and you want to return to the page to select the other one, you need to edit page’s url and add this to the link – /wp-admin/admin.php?page=page-builder-selection. The whole url would look something like this – http://my-site.com/wp-admin/admin.php?page=page-builder-selection. But note that this only works if you haven’t started plugins’ installation process. Once you click on the next page to install and activate plugins, you won’t be able to return to the page to select between two demos. If you want to change page editor, you’ll need to completely delete the theme and plugins, and reinstall everything.
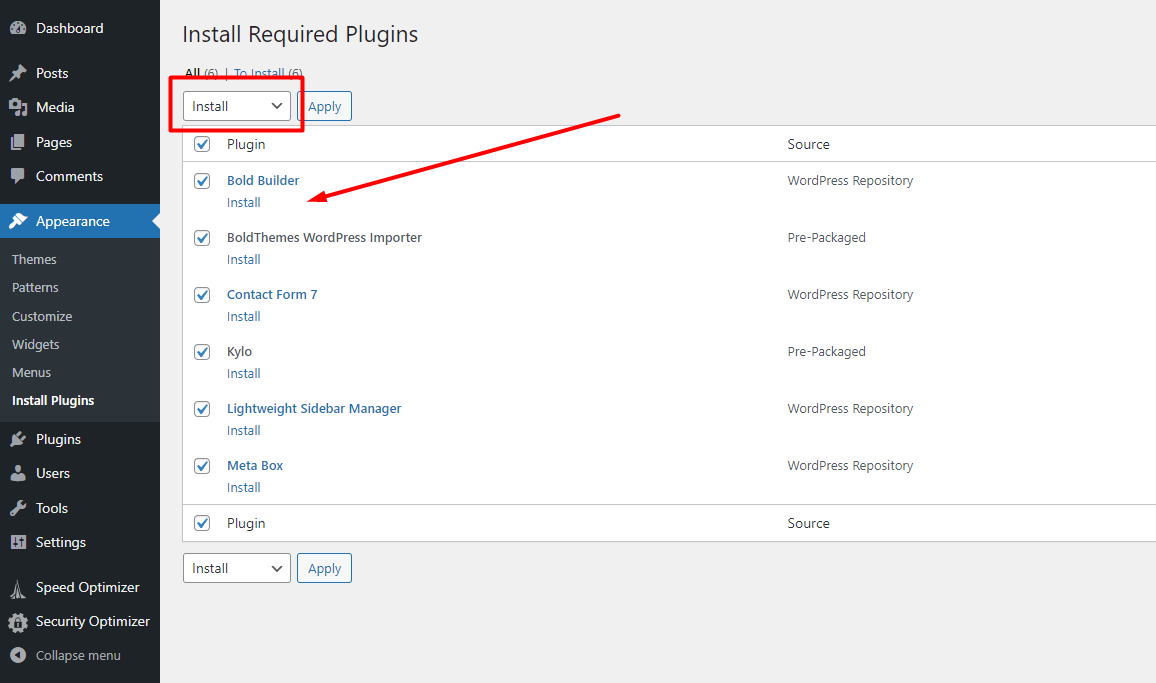
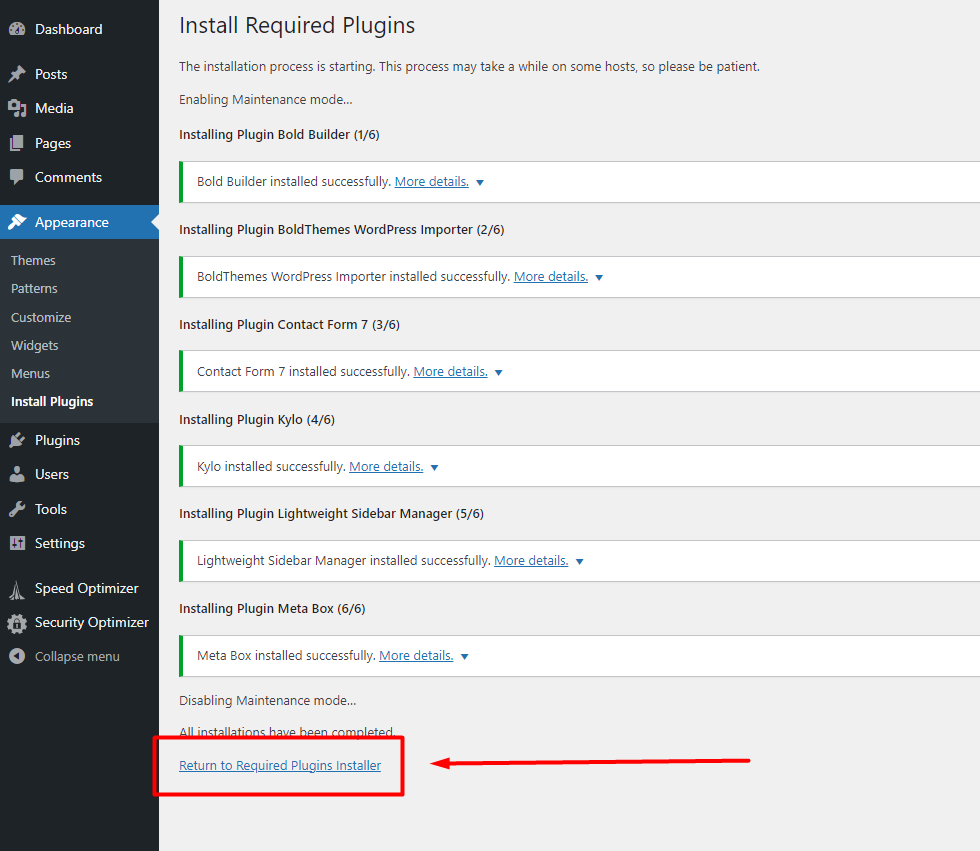
You will then be redirected to the ‘Install Required Plugins‘ page. Select all plugins, choose ‘Install‘ and click ‘Apply‘ button.
Once the installation is complete the following screen will appear. Click ‘Return to Required Plugins Installer‘ button at the bottom of the screen.
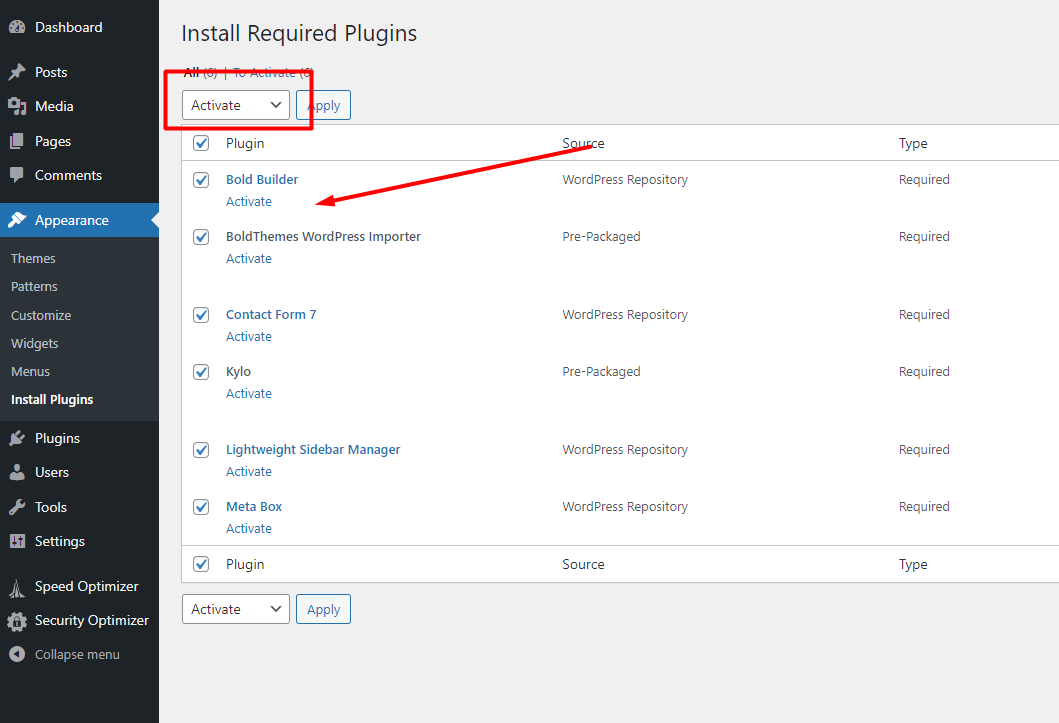
On the following screen, once again, select all plugins, choose ‘Activate‘ and click ‘Apply‘ button.
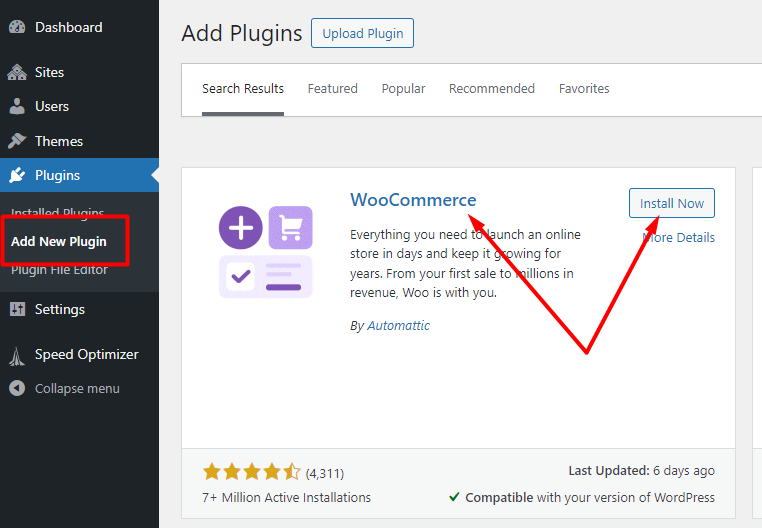
Last step is to install and activate WooCommerce plugin.
Please note that WooCommerce is not a required plugin, and you don’t need to install it if you won’t be using shop on your site.
If you are going to have a shop on your site, go to Plugins > Add New Plugin panel on your dashboard, search for WooCommerce, and then click to install and activate it.
*Please note that the above screenshots are for demo with Bold Builder plugin, but the installation steps are the same for Elementor demo (except you won’t see Bold Builder on your plugins list, and instead you’ll have Elementor).
In order to increase size of the logo navigate to the Appearance > Customize > Header and Footer and in Logo Height (in px) field write the number according to your needs:
93. How to update a plugin?
There are two ways to update Bold Timeline plugin - through wp-admin or through FTP.
Since plugin version 1.0.3 it is possible to update plugin through your dashboard, in Updates panel. In order to be able to do this, you will need to register your purchase code.
You can register your purchase code in Bold Timeline >Product License panel, on your dashboard.
Other option to update Bold Timeline to the latest version is to download the plugin folder from the download section of your CodeCanyon profile and update through FTP. We suggest that you use Filezilla to access your server. Here is the article that explains how Filezilla works.
Extract bold-timeline file from the folder you downloaded, and upload it to /wp-content/plugins/ folder of your WordPress installation. You will be prompted to overwrite the existing files. Select ‘Yes’, and the plugin will update.
If you have made some changes in the plugin’s code, you will need to reapply the changes in the new version.
Timelines that were made before update will be preserved.
94. How to edit Footer area on the theme?
On Appearance > Customize > Header and Footer panel there is a Footer Page Slug.
This field should contain the slug of the page which serves as a template for footer area. All pages inherit settings, elements and shortcodes of the page referenced via this field.
In order to change elements in footer, please locate the page (on all pages list) with the slug entered in Footer Page Slug field and edit it.
95. I can’t upload plugin. It’s saying it is invalid. What went wrong?
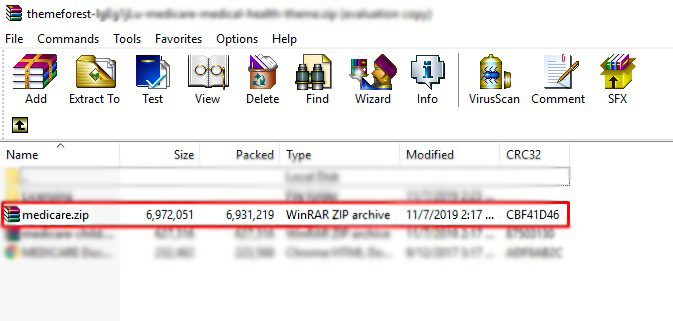
Please unpack plugin folder and upload to your wp-content/plugins using FTP. The archive contains not only plugin but also the other files.
If you want to upload in admin panel, you need to unpack plugin folder (bt_cost_calculator) and pack it again as zip and then upload that zip.
96. How to make a page load with accordion items closed by default
In order to make a page load with accordions collapsed by default, please edit fitness-club/bt_elements.js file in your wp-content/plugins folder and locate the following statements:
$( '.tabsVertical' ).each(function(){ $( this ).find( '.tabAccordionTitle' ).first().click(); });
Remove these statements from file or comment them out and your accordions will remain closed on page load.
97. How to edit Footer area?
On Appearance > Customize > Header and Footer panel there is a Footer Page Slug.
This field should contain the slug of the page which serves as a template for footer area. All pages inherits settings, elements and shortcodes of the page referenced via this field.
In order to change elements in footer, please locate the page (on all pages list) with the slug entered in Footer Page Slug field and edit it.
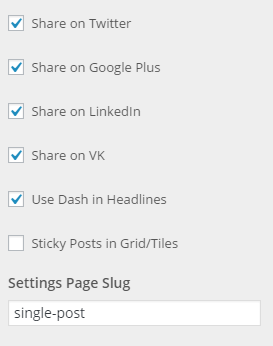
98. How to change the header and edit other Single Post settings?
All single posts inherit the settings from their template page. In order to edit excerpt text and header background image, please locate this page on All Pages list, and proceed to follow instructions from our article.
In order for this page to work as a template page for single posts, make sure to add its slug to Settings Page Slug field in Appearance >Customize >Blog panel.
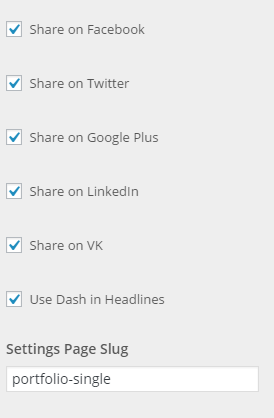
99. How to change the header and edit other Single pages of Portfolio items settings?
All single portfolio items inherit the settings from their template page. In order to edit excerpt text and header background image, please locate this page on All Pages list, and proceed to follow instructions from our article.
In order for this page to work as a template page for single portfolio items, make sure to add its slug to Settings Page Slug field in Appearance >Customize >Portfolio panel.
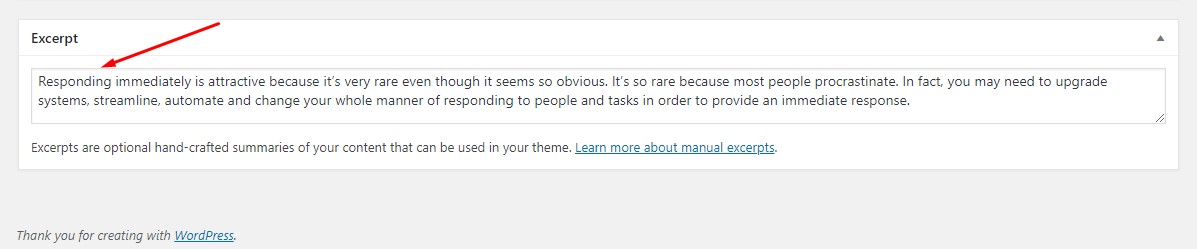
100. How to change the Excerpt text and Header background image?
In order to edit / remove excerpt text, navigate to the Page editor, and in Screen Options (at the top of the dashboard) enable Excerpt field.
After that, scroll to the bottom of the page editor where you’ll find Excerpt text.
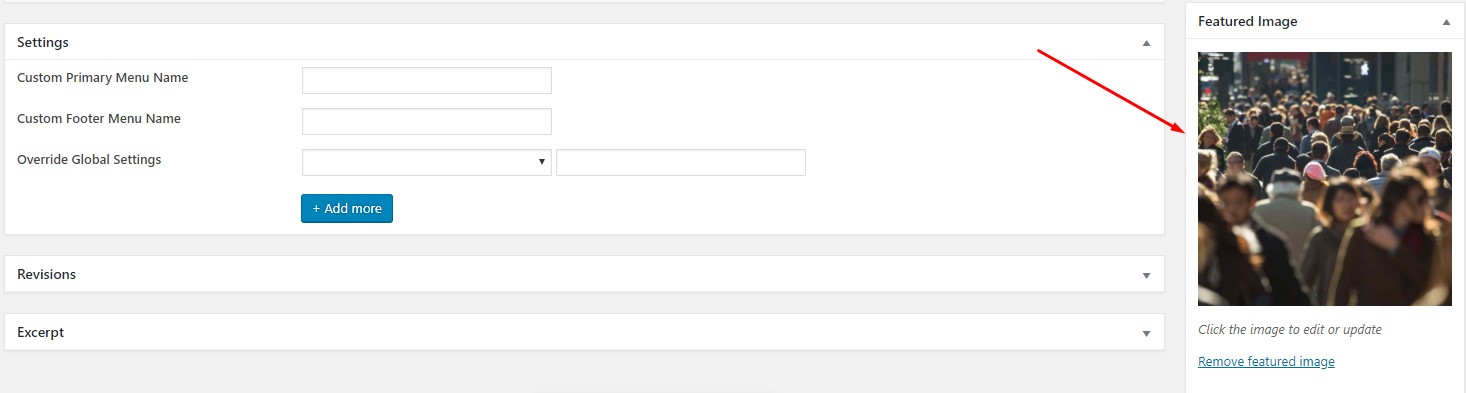
The Header background image represents featured image added to the page. In order to replace existing image with your own, click on the image, and when redirected, select image from Media Library.
In order to entirely remove the image, click on ‘Remove featured image’ button.
In order to remove entire Header from pages, make sure to check ‘Hide Default Headline’ field in Appearance >Customize >General Settings panel, or in Override Global Settings at the bottom of the page editor:
Should you want to edit header on Single Post, Single Product or Single Portfolio then first locate page which settings are inherited. For more info refer to the articles:
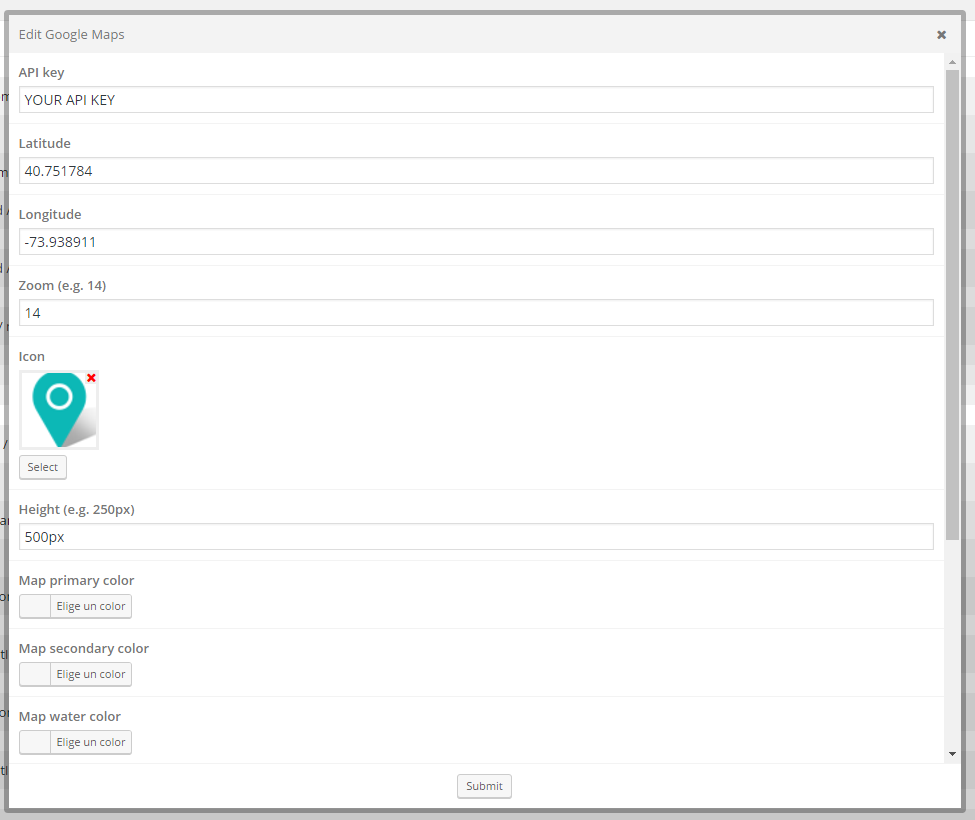
101. How to place more than one marker on the map?
Currently Cargo's map element does not support multiple markers. You need to customize Cargo's plugin a bit to achieve this. Please edit bt_gmap.js in your Cargo plugin's folder (usually /wp-content/plugins/cargo/) and find the following statements:
var marker = new google.maps.Marker({
 position: myLatLng,
 map: map,
 icon: icon
 });
In order to add another marker please add the following just below the referenced statements:
var myLatLng = new google.maps.LatLng( 41.7144678, -75.015827 );
 var marker = new google.maps.Marker({
 position: myLatLng,
 map: map,
 icon: icon
 });
where 41.7144678 and -75.015827 are latitude and longitude. Please adjust them according to your needs.
For additional markers just repeat the procedure above.
In order to change the clients email, then you should locate the bt_cost_calculator.php file and find function bt_cc_callback() in the code. The email formatting starts from the line:
$message_to_admin = ...
104. Is there some way I can see all the icons of the theme?
We use Font Awesome sets of icons in the theme. Please refer to the link for preview of icon set.
105. Installing Demo Content
The best way to start is to install demo content. If you want to install demo content please do the following:
First, delete all sample content (posts and pages) which is automatically created when WordPress is installed. If you have already added a new content, please make sure to do the backup in order to save the content. After the backup, delete all content and you can start with the next steps:
1. Start with fresh WordPress installation and make sure that theme and required plugins
are installed. Since some demos contain WooCommerce data, please install WooCommerce
plugin. Once you finish with the installation, you can remove WooCommerce plugin if you do not need it.
2. Go to ‘Tools > BT Import’ and select demo which you want to install.
3. Wait until you get message that import is finished. If you see red colored error message, just repeat the import until you get the message that import is finished. Import is incremental process and will finish eventually.
4. If you have imported demo with WooCommerce content, go to WooCommerce > Settings > Products > Display and select Shop as Shop Page; open Checkout tab and
select Cart as Cart Page and Checkout as Checkout Page; open Accounts tab and select My Account as My Account Page.
Check our video tutorial how to install theme and import demo content.
106. How to update installed theme? Will it change data?
Once the new theme version is available, user who purchased the theme should get email note from the Envato (ThemeForest).
There are three ways to update the theme:
1)FTP Update
Download newest theme version from ThemeForest Download section. Since you already have the theme installed, you can download just 'Installable WordPress file only'.
In case you want to use this method, we suggest that you use Filezilla to access your server. Here is the article that explains how Filezilla works.
You need to extract theme file from the zipped folder you downloaded, and upload it to /wp-content/themes folder on your server. You will be prompted to overwrite the existing files. Select 'Yes', and the theme will update.
*The example is the zip file from Medicare theme but the process is the same for all themes.
2) Update theme via ZIP file upload
This method is available since WP version 5.5. Please follow these steps:
From WP dashboard go to Appearance > Themes,
Click Add New button,
Click Upload Theme button,
Click Choose File to select previously downloaded zip archive, then click Install Now,
Wait for the upload to finish, then click Replace current with uploaded button.
3) Envato Market plugin
Enable automatic theme update with the Envato Market Plugin. Once you install and activate this plugin, every time a new theme version becomes available, you will be able to update it with just one click.
You will need to go to the WordPress Updates page and navigate to the Themes section. The new version will be included in the section just like the themes from the WordPress repository.
* Whichever of these three methods you use for theme update, you will have to update theme plugin (and possibly some other required plugins) as well.
For plugin updates, you will get notification on your dashboard when new version is available.
Please note...
If you made any changes in the source code you'll need to reapply them to the new version of the theme or they will be lost.
To prevent this, you can use child theme.
All settings in Customize panel and your content will be preserved.
The best way to start is to install demo content. If you want to install demo content please do the following:
Go to ‘Tools > Import > WordPress’ and install WordPress Importer plugin if it is not already installed.
When it is installed, choose xml file from demo_data folder and click ‘Upload file and import’. On the following screen make sure that ‘Download and import file attachments’ is checked. Click ‘Submit’ button and wait until import is finished.
You should see imported demo timelines in Bold Timeline panel.
108. How to install Hero Posts plugin
There are two methods of installing a plugin onto your WordPress site. You can use the WordPress Admin panel to upload and install the plugin, or you can use FTP software instead.
WordPress Plugin Installation
To install the plugin directly from the WordPress admin panel, please first log-in to your wp-admin console.
Navigate to Plugins > Add New,
Click Upload Plugin,
Click Choose File.
If you want to upload in admin panel, you need to extract plugin folder (hero-posts folder), from downloaded hero-posts.zip file and pack it again as zip and then upload that zip.
Click Install Now and the installation will begin.
Once the installation is complete, go to Plugins screen and look for the newly uploaded Hero Posts in the list.
Click Activate to activate it.
FTP Installation
To install the plugin using FTP software, log in to the server where your WordPress website is hosted. First extract hero-posts folder from downloaded hero-posts.zip file.
Now connect to your server via FTP and navigate to the wp-content/plugins folder in your WordPress directory online. Upload hero-posts folder to the plugins’ folder on your remote server.
Once the plugin is uploaded, you need to activate it. Go to ‘Plugins > Installed Plugins’, find Hero Posts and click ‘Activate’ button.
109. My articles are not visible on homepage
If you added your posts and categories, but they are not visible on homepage, it is possible that sections on homepage still have default categories that come with demo.
In order to change them, navigate to page editor and in Edit Section panel, tab Posts, add your desired categories (if the fields are left empty, section will display posts from all categories).
Note that Article Container element also has category filters that you need to adjust to show your posts and categories.
110. How to increase the size of the logo?
In order to increase size of the logo you need to add the following CSS statements to Custom CSS field of Appearance > Customize > General panel:
Please adjust the numbers according to your needs. The first number (100px) represents the height of the logo and the second (25px) represents the top margin between the header widget elements and viewport's top.
111. Theme update - Ad Astra to Ajani
Once you receive an email that new theme version is available, you will notice that its name has changed.
The Ad Astra theme is now named Ajani, but note that no changes were made in the theme code and you will be able to update it easily.
In this case there are two ways to update the theme.
1) FTP Update
Download newest theme version from ThemeForest Download section. Since you already have the theme installed, you can download just 'Installable WordPress file only'.
In case you want to use this method, we suggest that you use Filezilla to access your server. Here is the article that explains how Filezilla works.
You need to extract theme file from the zipped folder you downloaded, and upload it to /wp-content/themes folder on your server.
*PLEASE NOTE - you will not be asked to overwrite the existing files because they are named differently. You just need to upload the new theme folder.
*The example is the zip file from Medicare theme but the process is the same for all themes.
2) Update theme via ZIP file upload
This method is available since WP version 5.5. Please follow these steps:
From WP dashboard go to Appearance > Themes,
Click Add New button,
Click Upload Theme button,
Click Choose File to select previously downloaded zip archive, then click Install Now.
Once the new theme is uploaded, go to Appearance >Themes panel, deactivate old Ad Astra version, and activate new Ajani theme version.
Then, go to Plugins panel on your dashboard. First, deactivate old Ad Astra plugin, and then install and activate new Ajani plugin (note that you need to do it in this order to prevent site from crashing).
Once the new Ajani theme and plugin are activated, you can proceed to delete old Ad Astra theme and plugin.
Note that this is a one time thing, all updates after that will have the theme name Ajani, so you will be able to use standard procedure for theme update.
And lastly, if you are using a child theme, you will need to change every occurrence of 'ad-astra' name with 'ajani' in child theme's functions.php file.
112. Installing Demo Data
Before importing our demo content, please make sure that you have installed and activated all our required plugins (and WooCommerce if you intend to use it).
The best practice is to start with fresh WordPress installation without previous content. If you have already added a new content, please make sure to do the backup in order to save that content. After the backup, delete all content and you can start with the next steps:
The procedure is as follows:
Login to the wp-admin panel
Go to Tools > BT Import
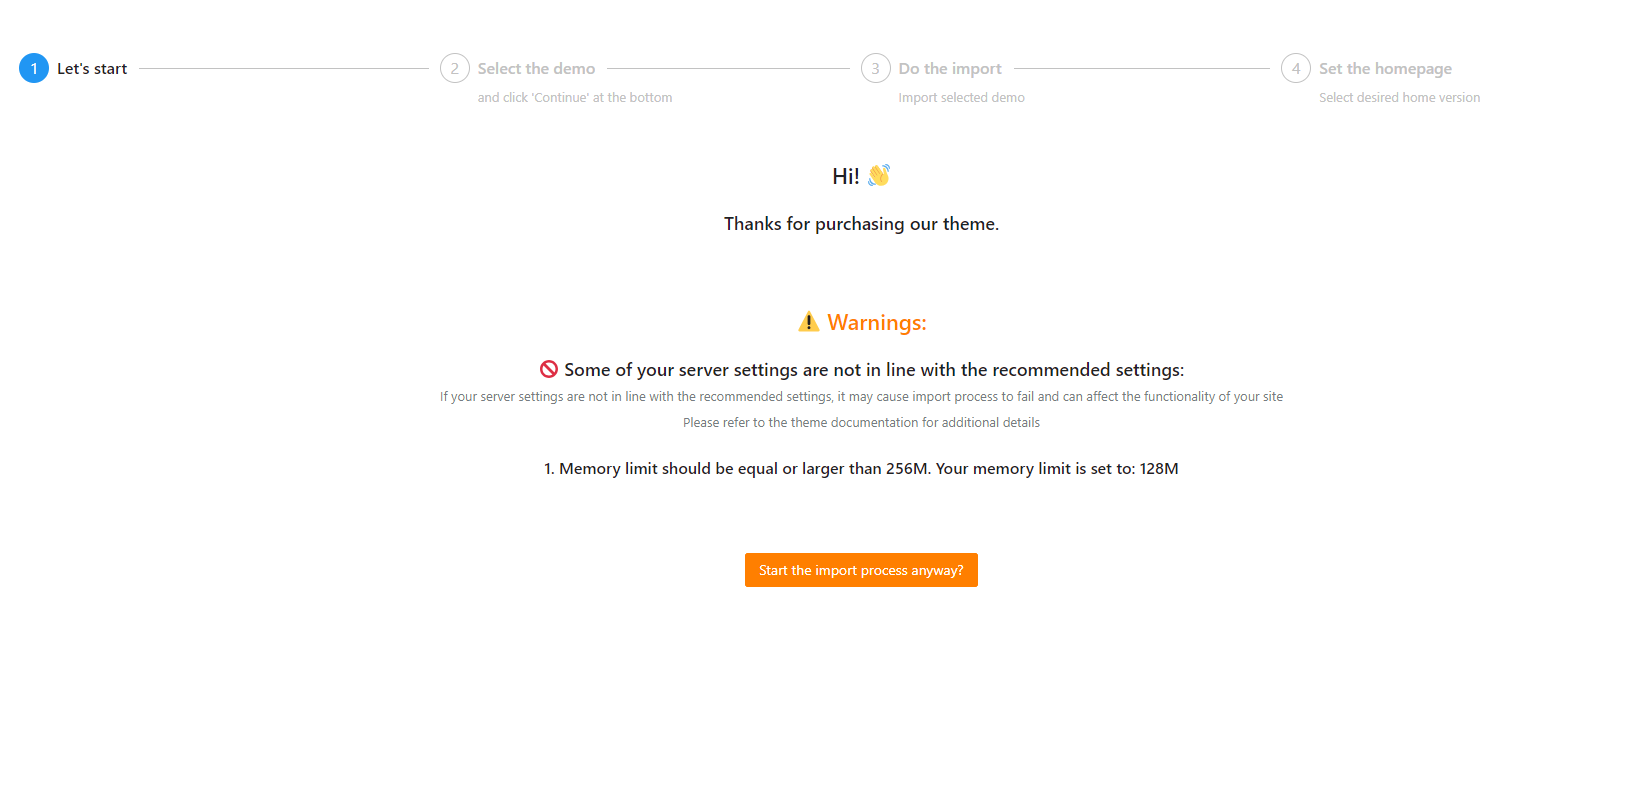
3. The first step of import process is to, once again, check your server settings. On this screen you will see if you have enough memory and script timeout, and if your PHP version is up to date.
Additionally, you will get a notification if you have previously installed our demo content.
Once you adjust all the settings, click ‘Start the import process’ button.
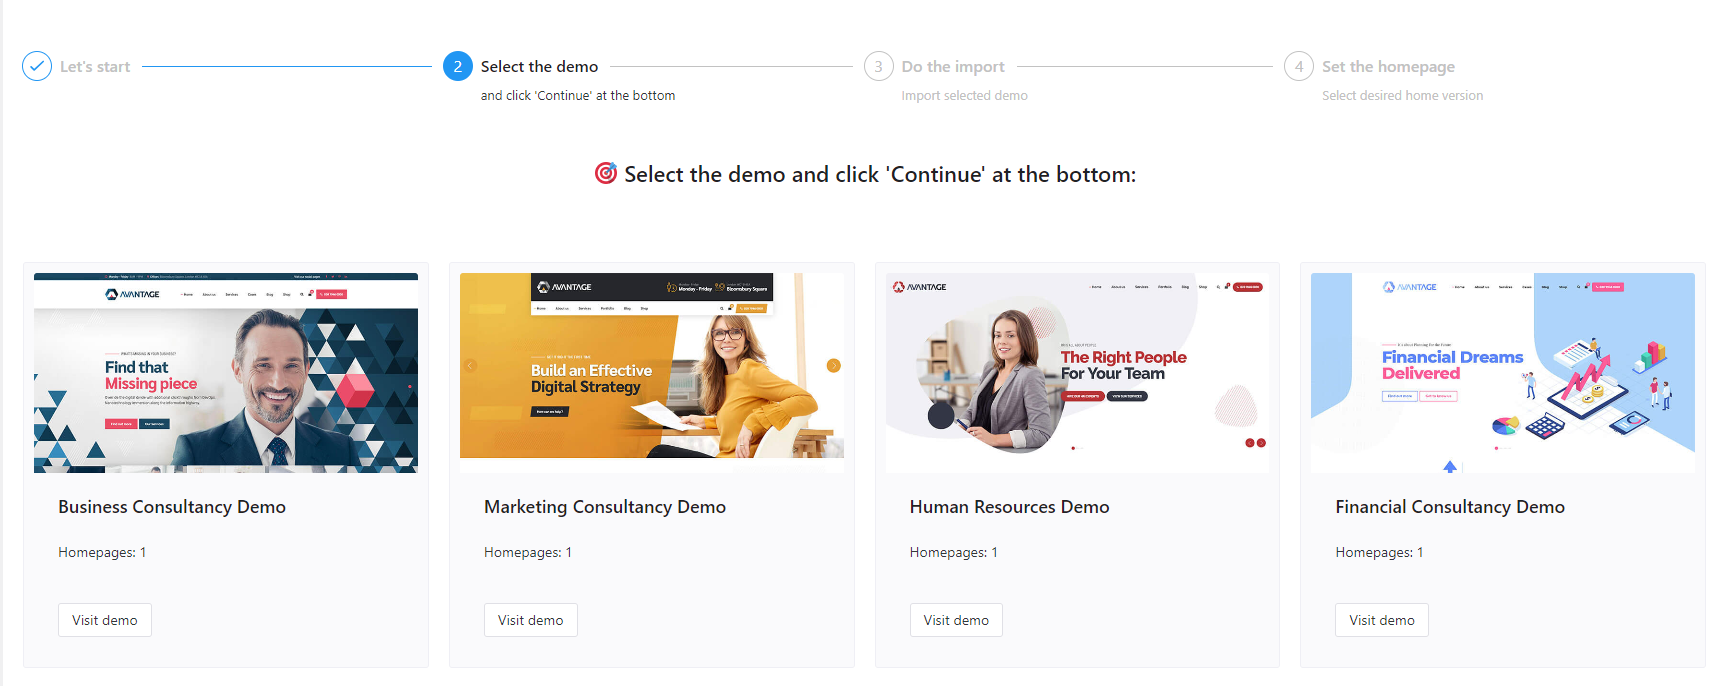
4. On the next panel you will see available demos. The number of homepages for each demo is noted, and you can click on the button ‘Visit demo’, and see how each demo looks like.
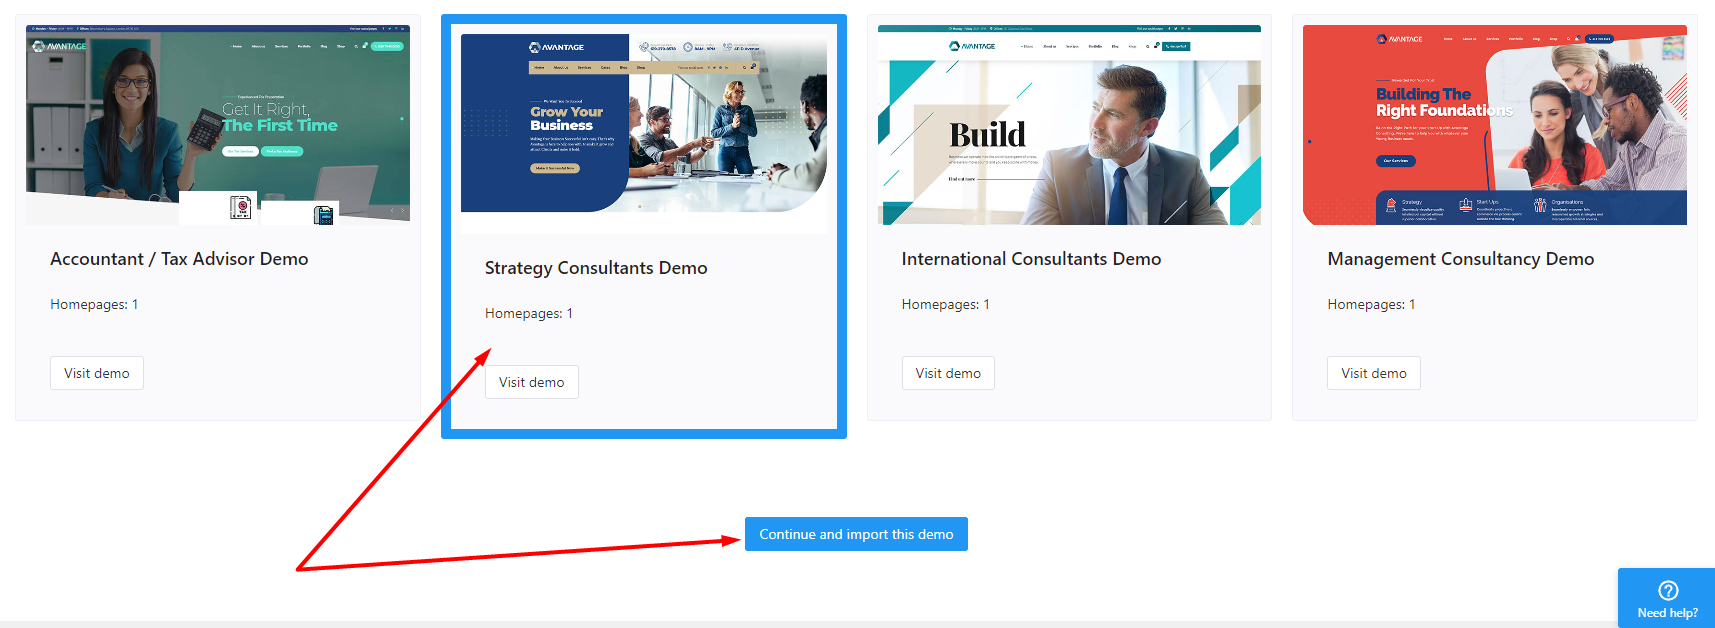
Click on the demo you want to install, and then click on ‘Continue and import this demo’ button at the bottom of the screen.
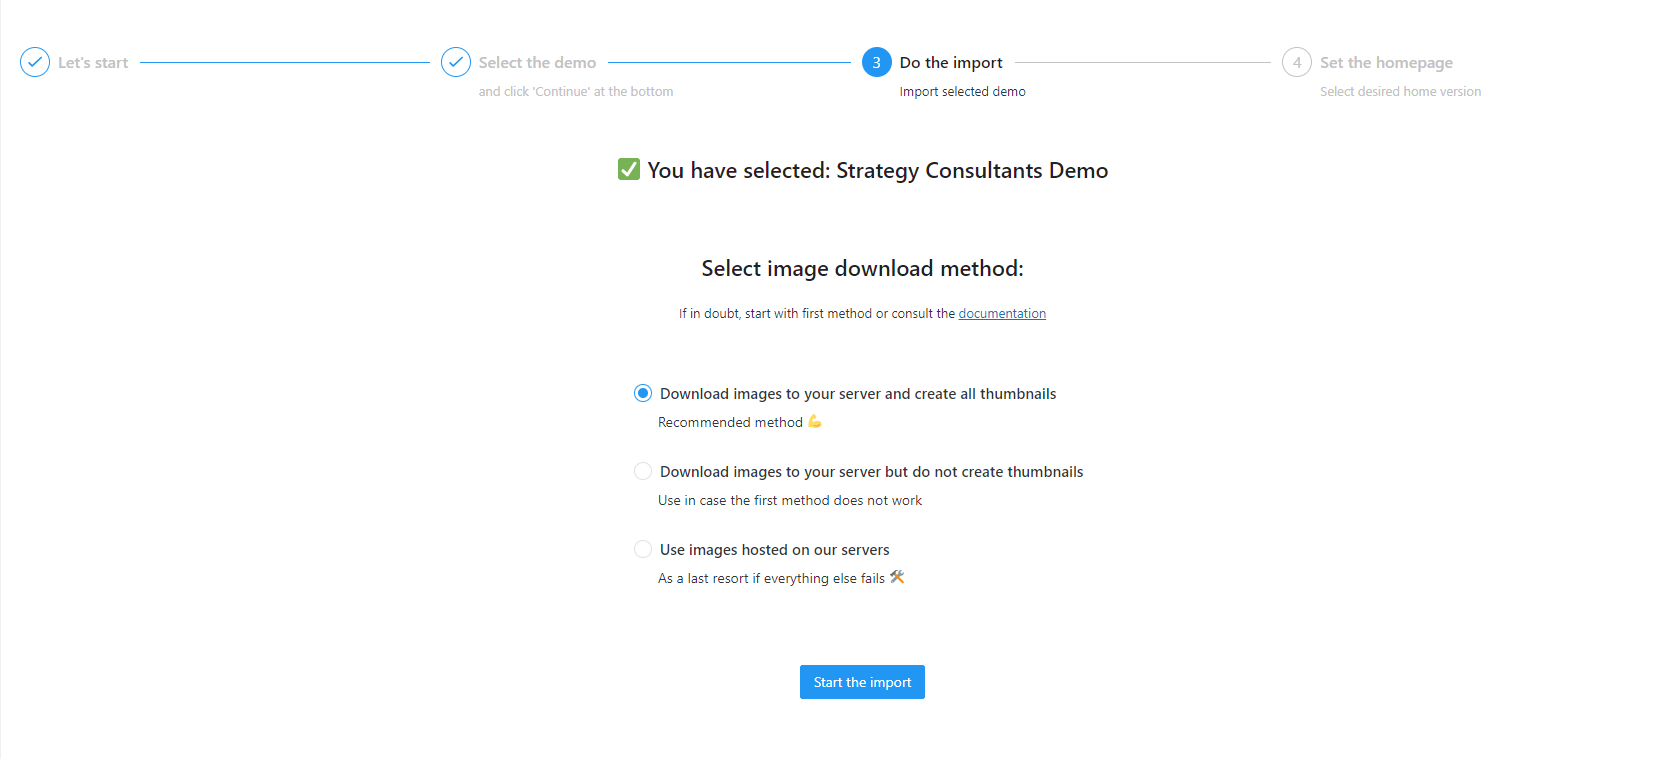
5. The following step is to select images’ download method.
Here is how each option works:
First option, ‘Download images to your server and create all thumbnails‘, is the best option and the one we recommend.
However, for this option all server requirements need to be met. Additionally, make sure that curl library is available and enabled.
2. Second option, ‘Download images to your server but do not create thumbnails‘, will still download images to your server, but will not create necessary thumbnails (to speed up the import process).
If you are going to use this method, install and activate ‘Regenerate Thumbnails’ plugin, and once the demo import is finished, regenerate thumbnails for all images.
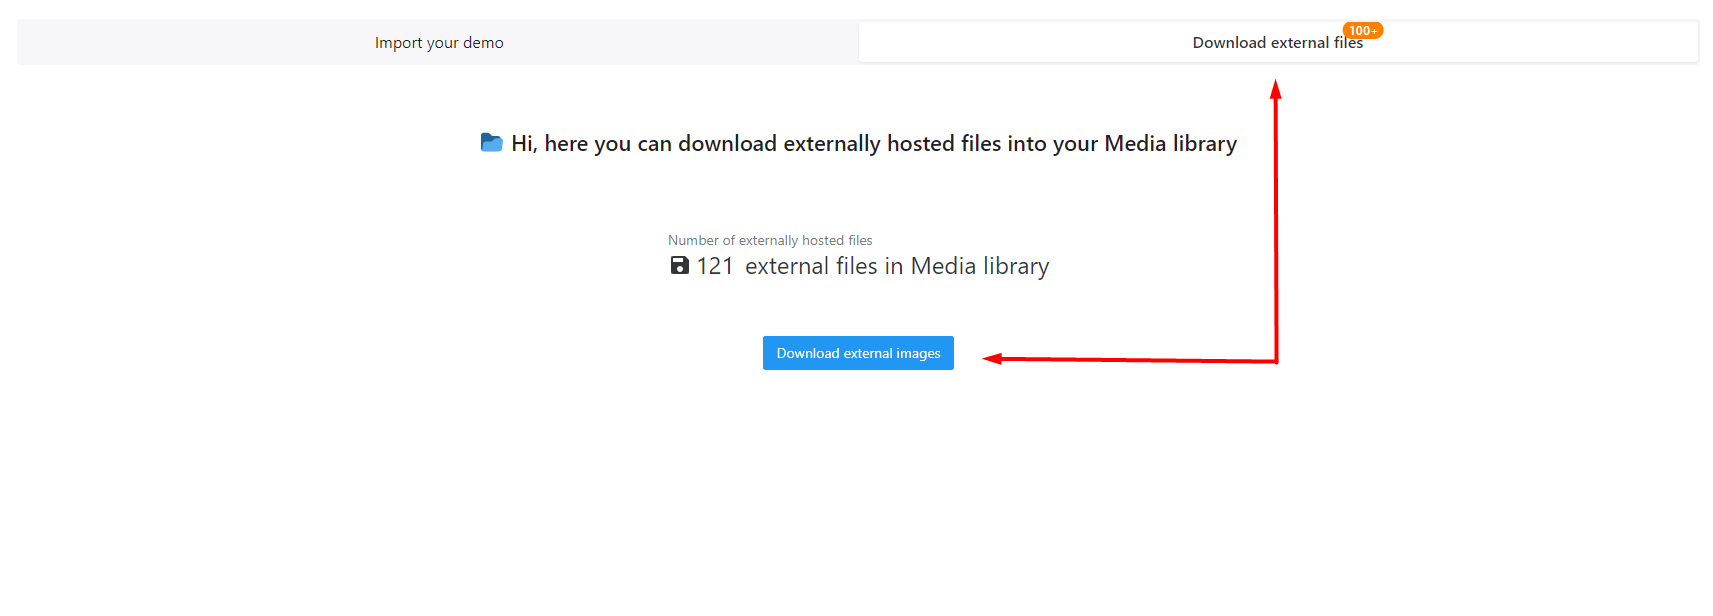
3. Last option, ‘Use images hosted on our servers‘, will import demo the fastest, but the images will remain on our server.
What this means is that you need to keep BT WordPress Importer plugin active until you replace our images with yours. If you deactivate the plugin, the images will not be visible.
Once you finish with demo import and setting the homepage, you will be able to download the images from our server (refer to the additional step below).
Once you select images’ import method, click on the ‘Start the import’ button.
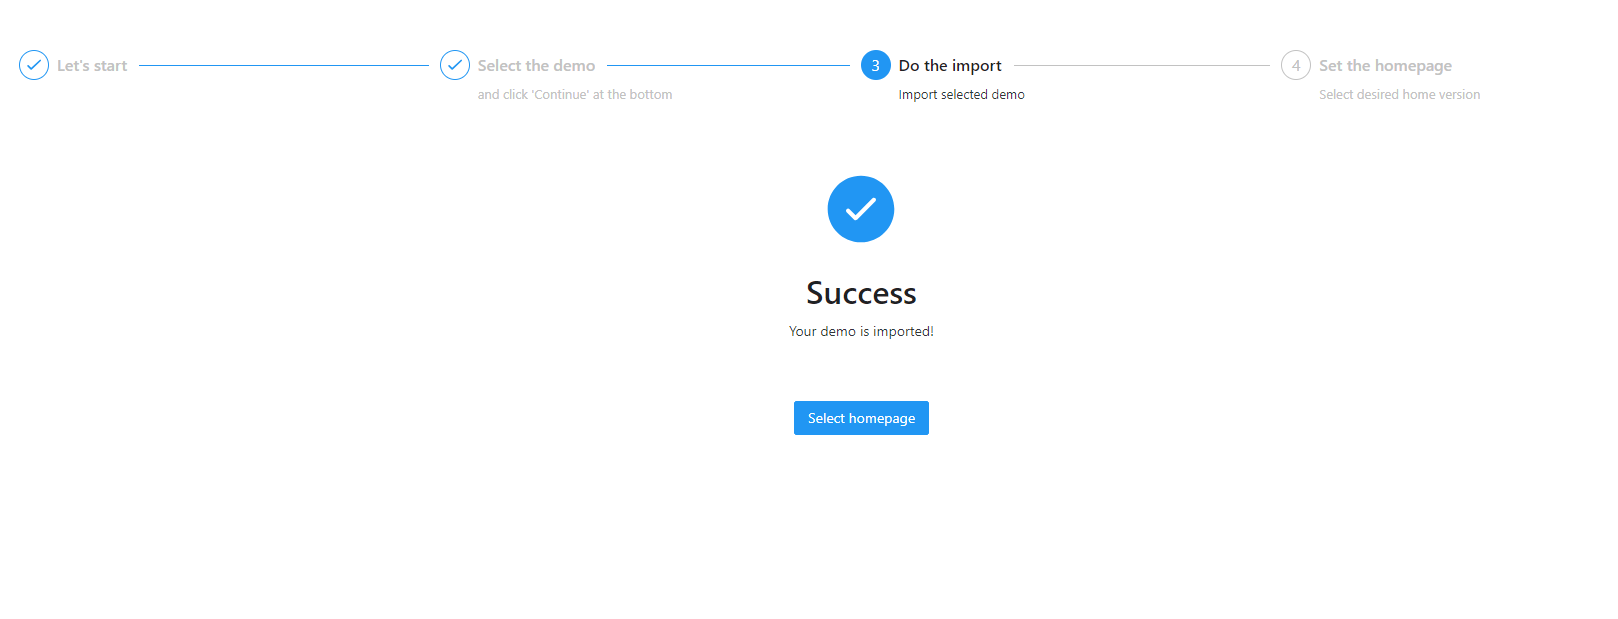
Depending on your server environment, and previously selected import method, the demo import process might take some time. Please be patient and don’t exit the import panel, otherwise you will stop the import.
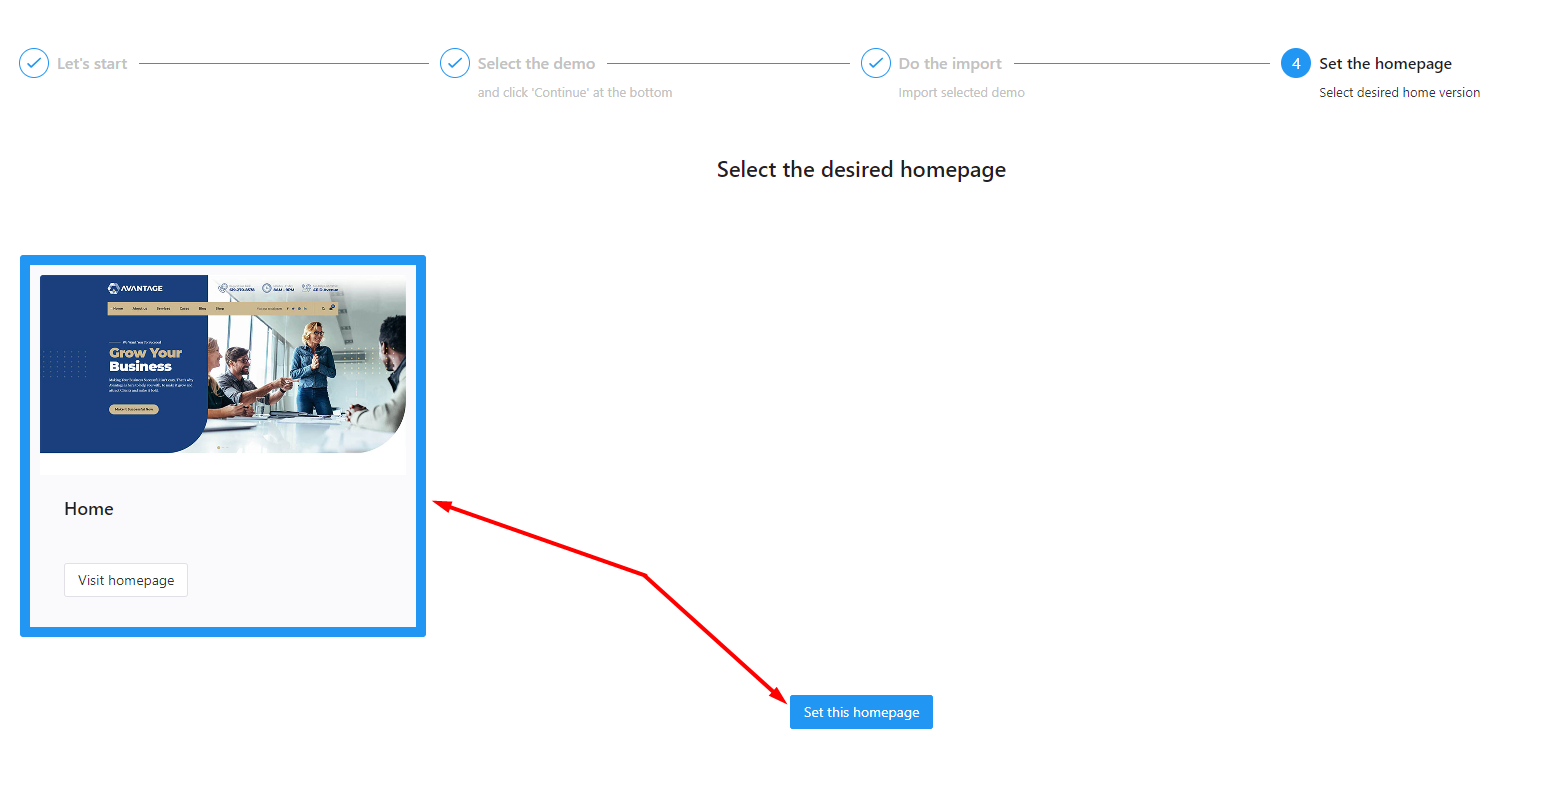
When the import is finished, you will see the following screen. Click on ‘Select homepage’ button.
6. The last step is to select the homepage. Please note that some demos have multiple homepages, and some only one.
If demo has multiple homepages, you can click on ‘Visit homepage’ button and see how each individual page looks like. Once you select desired homepage, click on it, and then on ‘Set this homepage’ button.
Once the homepage is selected, its settings (accent colors, fonts, footer, etc.) will be set in Customize panel and applied to inner pages.
Additional step:
If you selected ‘Use images hosted on our servers‘ option, you will now see ‘Download external files‘ tab on your screen.
When you click on it, you will see how many images are left on our server, and you’ll be able to download them to your server.
Note that you don’t have to download all of them at once. You can start the process, download first few images, and then stop. When you go to download tab again, you can start the process again, and it will download only images that are left on our server.
If you installed WooCommerce plugin, go to WooCommerce >Settings panel and set its pages (Shop, Cart, etc.)
If you are getting 404 error on inner pages, go to Settings >Permalinks panel and click ‘Save changes’ button to flush the permalink structure.
That’s it, the demo is imported! :)
Please note that screenshot examples are from our 'Avantage' theme, but the steps are the same for all of them.
113. How to leave a review?
If you are satisfied with our support or you like our product, please consider supporting us by giving us a rating at the downloads section of your ThemeForest profile (just below the download button) - http://themeforest.net/downloads.
When leaving a review, we encourage you to:
Leave ratings and reviews that are honest, respectful and constructive.
Try to resolve any issues with the theme / plugin by contacting us first before leaving a negative rating and review.
You can find more information on reviews in official Envato article.
Thanks a lot in advance! :)
114. How to set initial value for Slider item?
From Cost Calculator Version 1.2.1, initial value can be set in Cost Calculator Item Settings.
In order to set initial value for Slider item, you need to add the value between min and max values, in 'Initial value' field.
For example, if you have items from 0 (zero) to 200 in your slider, and you want the initial value to be 2 items, you should add 2 to the field.
115. How to add custom icon font
In order to add new icon font, you need to customize the theme. Please do the following steps:
1. First of all you need to import your font file.
2. Please take a look at the top of style.crush.css file and you will find @font-face declaration. You need to import your own font files in the same manner as FontAwesome and the rest and declare the font-family as 'myFont' or something similar.
3. Then you need to search for all 'data-ico-fa' in the style.crush.css file and create respective statements for your font. For example when you locate
4. Then, you need to create new file in celebration plugin folder called bt_mf_icons.php by copying the file bt_fa_icons.php and changing it by mapping you glyph codes:
5. Finally, you need to edit celebration.php in your plugin's folder, search for bt_fa_icons() and add respective statements for bt_mf_icons() as well. For example to change all occurrences of
Please refer to these links for preview of each icon set.
117. Embed code I have placed using text element is being cut off. It does not have the proper height. How can I resolve this?
It may happen that iframe created by your embed code gets cut off.
Please do the following to resolve this: 1. Define Custom Id for the section containing embed code (for example: section_1)
2. Add the following statements to Custom CSS field of Appearance > Customize > General panel
#section_1 iframe {
    height: 150px !important;
}
Adjust the height according to your needs.
118. How to translate plugin?
Translation using PoEdit
The procedure is standard – you can find the .pot file in the plugin’s languages folder.
Please use PoEdit - https://poedit.net/ to translate the .pot file and create respective .po and .mo fies.
You should upload .po and .mo files created using PoEdit back to plugin's languages folder.
Please name .po and .mo files e.g. bt-cost-calculator-nl_NL.po and bt-cost-calculator-nl_NL.mo (nl_NL is the language code for dutch) and place them in /wp-content/plugins/bt_cost_calculator/languages/.
For other languages code, please refer to the following link: Internationalization.
You can set the site language of your WordPress installation on Settings > General. WordPress will automatically use the right language files if they exist.
Once you have the plugin installed and activated, please do the following:
1. Go to Loco Translate > Plugins.
2. Click on Cost Calculator.
3. Click on Advanced tab and set Text Domain and File Prefix to “bt-cost-calculator”. By default they are probably “bt_cost_calculator”.
4. Set Template file to languages/bt-cost-calculator.pot and Save Config. Go to Overview Tab.
5. Click New Language and choose the language you have set in WordPress > General Settings.
6. Set Choose location to Author (plugins/bt_cost_calculator/languages/bt_cost_calculator-xx_XX.po).
7. Click Start translating.
8. Translate the strings you need - you do not have to translate the entire set.
9. Once you save the translation, the changes should be visible on Front End if you have done everything as described.
119. How to add new Font icons?
In order to add new Font icons, you should customize the theme. Please do the following steps:
1. First of all you need to import your font file.
2. Please take a look at the top of style.css file and you will find @font-face declaration. You need to import your own font files in the same manner as FontAwesome and the rest and declare the font-family as 'myFont' or something similar.
3. Then you need to search for all 'data-ico-fa' in the style.crush.css file and create respective statements for your font. For example when you locate
4. Then, you need to create new file in Medicare plugin folder called bt_mf_icons.php. As an example of how the PHP file should look, you can use one of the existing fonts (bt_fa_icons.php) and copy their files' content, and replace it with your glyph codes.
Or, you can use the following example, and just replace the glyph codes (numbers: f100, f101, f102 etc.) with the ones from your icon set.
5. Finally, you need to edit medicare.php in your plugin's folder, search for bt_fa_icons() and add respective statements for bt_mf_icons() as well. For example to change all occurrences of
Also, you need to edit bt_custom_icons.php in your plugin's folder, scroll to the bottom and add respective statements for bt_mf_icons() as well. You need to change
This requires customization of several theme files.
First of all you need to import your font file. Please take a look at the top of style.cargo.css file and you will find @font-face declaration. You need to import your own font files in the same manner as FontAwesome and the rest and declare the font-family as, for example 'myFont'.
Then you need to search for all 'data-ico-fa' in the style.cargo.css file and create respective statements for your font. For example when you locate
Please make sure to find all occurrences of data-ico-fa and create respective data-ico-mf statements.
Then, you need to create new file in cargo plugin folder called bt_mf_icons.php by copying the file bt_fa_icons.php and changing it by mapping your glyph codes:
Title in page headline is, by default, set to use h2 tag.
In order to change the tag, you will need to customize part of the theme's code, so some familiarity with PHP is necessary.
First, install and activate the child theme. Then, to child theme's functions.php file add the following code, below the default code that comes with the file.
122. How to make a page load with accordion items closed by default
In order to make a page load with accordions collapse by default, please edit hotelcalifornia/bt_elements.js file in your wp-content/plugins folder and locate the following statements:
$( '.tabsVertical' ).each(function(){
 $( this ).find( '.tabAccordionTitle' ).first().click();
 });
Remove these statements from file or comment them out and your accordions will remain closed on page load.
123. New YIHT 2.2.0 version broke my site - Problem is solved!
If you've updated YITH WooCommerce Wishlist plugin to the newest 2.2.0 version, it's possible that your site is broke (especially if WP_DEBUG is enabled).
In that case, please do the following:
1. Locate 237 line in yit-debug.php (located in \wp-content\plugins\yith-woocommerce-wishlist\plugin-fw\lib folder on your server):
Since Bold Timeline version 1.0.3, once you install and activate plugin (or just update plugin to that version if you had it previously), a new option, Product License, will appear in Bold Timeline panel.
Once you enter Bold Timeline's purchase code you will be able to receive notifications about new plugin versions, and update it through your dashboard, in Updates panel.
Please note that you are not required to enter purchase code in order for the plugin to work. Registration with purchase code is only used to receive plugin updates through wp-admin panel.
125. How to update a plugin?
There are two ways to update Cost Calculator plugin - through wp-admin or through FTP.
Since plugin version 2.2.4 it is possible to update plugin through your dashboard, in Updates panel. In order to be able to do this, you will need to register your purchase code.
You can register your purchase code in Cost Calculator >Product License panel, on your dashboard.
Other option to update Cost Calculator to the latest version is to download the plugin folder from the download section of your CodeCanyon profile and update through FTP. We suggest that you use Filezilla to access your server. Here is the article that explains how Filezilla works.
Extract bt_cost_calculator file from the folder you downloaded, and upload it to /wp-content/plugins/ folder of your WordPress installation. You will be prompted to overwrite the existing files. Select 'Yes', and the plugin will update.
If you have made some changes in the plugin's code, you will need to reapply the changes in the new version.
Cost Calculators that were made before update will be preserved.
126. Sticky Header scroll
With the latest theme version, sticky header scroll and offset can be defined in inline JS.
The code for sticky header is defined in header.misc.js file in /themes/your-theme-name/framework/js folder, but you can change the following values by adding them to Custom JS field in Appearance >Customize >General Settings panel.
First value is:
window.btStickyOffset = 300;
The number defines after how many pixels the sticky header appears (when scrolling down).
Second value is:
window.btStickyOpenTimeout = 50;
This value defines number of milliseconds it takes for sticky to show up (previous value 'stickyOffset' needs to be defined).
Note that we recommend this value to be over 50 to avoid cutting off sticky header.
Third value is:
window.btStickyCloseTimeout = 200;
This value defines number of milliseconds it takes for sticky to close and switch to standard header (when scrolling up).
Note that this value needs to be same or higher than the transition length defined with CSS.
Lastly, to define transition length, you can add the following CSS to Additional CSS field in Customize panel.
This number defines the speed of transition when activating / deactivating sticky header.
127. How to create One page
The best way to start is to install demo content. If you want to install one page demo please refer to the article: Installing Demo Content. You will be able to see how all elements on the single page are set.
Please have a look at the following steps, how to achieve one page:
1. Insert in required shortcode section Custom ID Attribute.
2. Then in Appearance > Menus add a new custom link and as a URL insert custom ID atribute with #.
128. How to increase the size of the logo?
In order to increase size of the logo you need to add the following CSS statements to Custom CSS field of Appearance > Customize > General panel:
.menuHolder .logo img {
    height: 70px;
}
Please adjust the numbers according to your needs.
129. Is there some way I can see all the icons of Organic Food theme?
Please refer to these links for preview of each icon set.
130. How to add Custom Font to your theme
In order to add custom font to your theme, you need to upload your custom font to the custom-fonts folder on your web server.
Go to \wp-content\themes\your_theme_name\assets\custom-fonts on your web server and create the folder named after your font and upload font ttf and/or woff and/or woff2 files to the folder.
Example - your folder structure should be like this for Great Sejagad font :
Once you do this, The font will be visible in all select boxes throughout wp-admin just as default Google Fonts and you will be able to select it just as any other
131. How to change the header and edit other Single Post settings?
On Appearance > Customize > Blog panel there is a Settings Page Slug field. This field should contain the slug of the page which serves as a template for all blog posts. All blog post will inherit settings and shortcodes of the page referenced via this field.
In order to change elements on blog posts, please locate the page with the slug entered in Settings Page Slug field and edit it.
132. How to edit Footer area?
On Appearance > Customize > Header and Footer panel there is a Footer Page field, and there you can see which page was selected as template page for footer.
This option enables you to have static page and use it as a footer template for all pages. All pages inherit settings, elements and shortcodes of the page referenced via this option.
In order to change elements in footer, please locate this page (on all pages list) and edit it.
*Note that the screenshot is from Nifty theme, but the process is the same on all themes.
133. How to redirect users to another page after the "Next" button?
Please find the following lines in cc.main.js file:
On Appearance > Customize > Header and Footer panel there is a Footer Page Slug.
This field should contain the slug of the page which serves as a template for footer area. All pages inherits settings, elements and shortcodes of the page referenced via this field.
In order to change elements in footer, please locate the page (on all pages list) with the slug entered in Footer Page Slug field and edit it.
1. The refund request is sent to us via email, and we decide if we are going to approve it or not.
2. Once the refund is approved, it can take between 3 to 5 days for Envato to transfer money back to your account.
3. If the refund is not approved, you can always raise a dispute.
You can find additional guidelines on the refund in the official Envato article.
136. How to make a page load with accordion items closed by default
In order to make a page load with accordions collapse by default, please edit showcase/bt_elements.js file in your wp-content/plugins folder and locate the following statements:
$( '.tabsVertical' ).each(function(){
 $( this ).find( '.tabAccordionTitle' ).first().click();
 });
Remove these statements from file or comment them out and your accordions will remain closed on page load.
137. How to enter Purchase Code?
Since Cost Calculator version 2.2.4, once you install and activate plugin (or just update plugin to that version if you had it previously), a new option, Product License, will appear in Cost Calculator panel.
Once you enter Cost Calculator's purchase code you will be able to receive notifications about new plugin versions, and update it through your dashboard, in Updates panel.
Please note that you are not required to enter purchase code in order for the plugin to work. Registration with purchase code is only used to receive plugin updates through wp-admin panel.
138. How to have a Split Screen page
In order to have split screen page, please do the following steps:
1. First, create a new page and then switch to the classic editor.
2. Please find the code at the following link: Split Screen. Paste the attached code into the Text tab.
3. At the bottom of the page set Animations property to Half Page.
You will not get images, so you would need to add your own images as section backgrounds. In order to have the same effect as on the demo, you need to style your images like this:
139. Installing Demo Content
The best way to start is to install demo content. If you want to install demo content please do the following:
1. Start with fresh WordPress installation and make sure that theme and required plugins
are installed.
2. Go to ‘Tools > BT Import’ and select demo which you want to install.
3. Wait until you get message that import is finished. If you see red colored error message, go to Media Library and delete any unfinished downloads (images) and repeat the import.