1. Can I redirect users to another page after submitting message?
2. I can’t upload plugin. It’s saying it is invalid. What went wrong?
3. How to update a plugin?
4. How to translate plugin?
5. How to set the initial value for Select item?
6. I want to add custom CSS statements to style my calculator. Where should I add them?
7. How to remove the 'Next' button?
8. How do I get 1.000 format for the total value?
9. How to prevent selection of weekends in date picker?
10. Will I loose content when updating the plugin?
11. How to set initial value for Switch item to True?
12. How to change the e-mail address from Wordpress?
13. Where is my Purchase Code?
14. How to add additional fields to contact form part of Cost Calculator?
15. How do I remove the bar with Total and leave contact form?
16. How to edit clients email?
17. How to set initial value for Text item?
18. How to set initial value for Slider item?
19. Importing Demo
20. How to install Cost Calculator plugin?
21. Contact form visible by default
22. How to leave a review?
23. How to redirect users to another page after the "Next" button?
24. How to ask for a refund?
25. How to enter Purchase Code?
26. How can I change total format’s display?
1. Can I redirect users to another page after submitting message?
Since Cost Calculator Version 1.2.1, Cost Calculator Settings contain the field for URL that you want your users to be redirected to.
In order to redirect users to another page after submitting the form, add the URL to ‘Optional URL for confirmation’ field.
2. I can’t upload plugin. It’s saying it is invalid. What went wrong?
Please unpack plugin folder and upload to your wp-content/plugins using FTP. The archive contains not only plugin but also the other files.
If you want to upload in admin panel, you need to unpack plugin folder (bt_cost_calculator) and pack it again as zip and then upload that zip.
3. How to update a plugin?
There are two ways to update Cost Calculator plugin - through wp-admin or through FTP.
Since plugin version 2.2.4 it is possible to update plugin through your dashboard, in Updates panel. In order to be able to do this, you will need to register your purchase code.
You can register your purchase code in Cost Calculator >Product License panel, on your dashboard.
Other option to update Cost Calculator to the latest version is to download the plugin folder from the download section of your CodeCanyon profile and update through FTP. We suggest that you use Filezilla to access your server. Here is the article that explains how Filezilla works.
Extract bt_cost_calculator file from the folder you downloaded, and upload it to /wp-content/plugins/ folder of your WordPress installation. You will be prompted to overwrite the existing files. Select 'Yes', and the plugin will update.
If you have made some changes in the plugin's code, you will need to reapply the changes in the new version.
Cost Calculators that were made before update will be preserved.
4. How to translate plugin?
Translation using PoEdit
The procedure is standard – you can find the .pot file in the plugin’s languages folder.
Please use PoEdit - https://poedit.net/ to translate the .pot file and create respective .po and .mo fies.
You should upload .po and .mo files created using PoEdit back to plugin's languages folder.
Please name .po and .mo files e.g. bt-cost-calculator-nl_NL.po and bt-cost-calculator-nl_NL.mo (nl_NL is the language code for dutch) and place them in /wp-content/plugins/bt_cost_calculator/languages/.
For other languages code, please refer to the following link: Internationalization.
You can set the site language of your WordPress installation on Settings > General. WordPress will automatically use the right language files if they exist.
Once you have the plugin installed and activated, please do the following:
1. Go to Loco Translate > Plugins.
2. Click on Cost Calculator.
3. Click on Advanced tab and set Text Domain and File Prefix to “bt-cost-calculator”. By default they are probably “bt_cost_calculator”.
4. Set Template file to languages/bt-cost-calculator.pot and Save Config. Go to Overview Tab.
5. Click New Language and choose the language you have set in WordPress > General Settings.
6. Set Choose location to Author (plugins/bt_cost_calculator/languages/bt_cost_calculator-xx_XX.po).
7. Click Start translating.
8. Translate the strings you need - you do not have to translate the entire set.
9. Once you save the translation, the changes should be visible on Front End if you have done everything as described.
5. How to set the initial value for Select item?
From Cost Calculator Version 1.2.1, initial value can be set in Cost Calculator Item Settings.
In order to set initial value for Select item, you need to add the index of the item you want to display as initial, in 'Initial select list index' field.
For example, if you have three items in Select field, and you want the second one to be initial, you would add number 2 to the field.
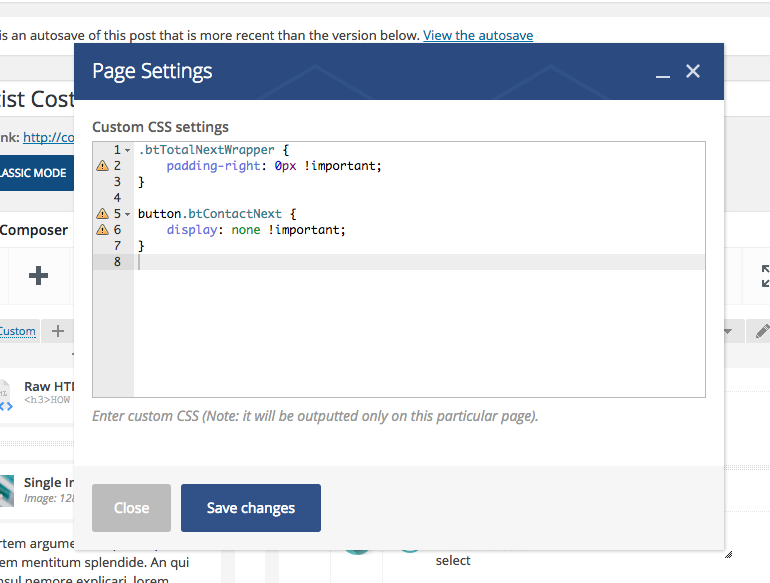
6. I want to add custom CSS statements to style my calculator. Where should I add them?
Custom CSS code should be added to your theme's Custom / Additional CSS field.
If you use WP Bakery Page Builder (former Visual Composer) you should click on Page Settings button in the upper right corner of WP Bakery Page Builder's interface on relevant Page Edit Form:
Alternatively, you can use third party plugin, e.g. Simple Custom CSS.
7. How to remove the 'Next' button?
From Cost Calculator Version 1.2.1, 'Next' button can be removed in Cost Calculator settings.
In order to hide ‘Next’ button, deselect the ‘Enable Contact Form’ field.
8. How do I get 1.000 format for the total value?
In order to change format of total value, you'll need to modify plugin’s code.
Please locate line 544 in cc.main.js in plugin’s folder. It should have the following code:
total = total.toFixed( decimals );
Replace the noted line with the following statement:
total = Math.round(total);
        total = total.toString().replace(/\B(?=(\d{3})+(?!\d))/g, ".");
Make sure to clear cache after making the changes.
9. How to prevent selection of weekends in date picker?
We can provide no weekend function into the date picker option. Please follow next steps:
1. Use next Custom CSS and add them to Customizer > Additional CSS field:
10. Will I loose content when updating the plugin?
With new plugin update you will not loose any content, but it will affect and overwrite any changes in the bt_cost_calculator.php code that you've made. The best way is to manually repeat modifications with new update.
11. How to set initial value for Switch item to True?
From Cost Calculator Version 1.2.1, initial value can be set in Cost Calculator Item Settings.
In order to set initial value for Switch item, you need to add 'On' value to 'Initial value' field.
For example, if 'On' value is 1, you should add number 1 to the field.
12. How to change the e-mail address from Wordpress?
In order to change the sender name, if the visitor and admin are receiving an e-mail from "Wordpress", we suggest you to avoid code customization and to install a third party plugin which will allow this. For example this one: WP Simple Mail Sender.
This will create the new field in the form with the placeholder text myText. Change it according to your needs (edit placeholder="' . __( 'myText', 'bt_plugin' ) statement)
3. Locate the following piece of code in cc.main.js file:
'message' : c.find( '.btContactMessage' ).val()
and add above it the following:
'mytext' : c.find( '.myText' ).val(),
it will ensure that the value of the newly created field gets propagated to backend upon form submission
4. Locate the following piece of code in bt_cost_calculator.php file:
$message = $_POST['message'];
and add above it the following:
$mytext = $_POST['mytext'];
5. Locate the following piece of code in bt_cost_calculator.php file:
It will include the value of your field into the email body.
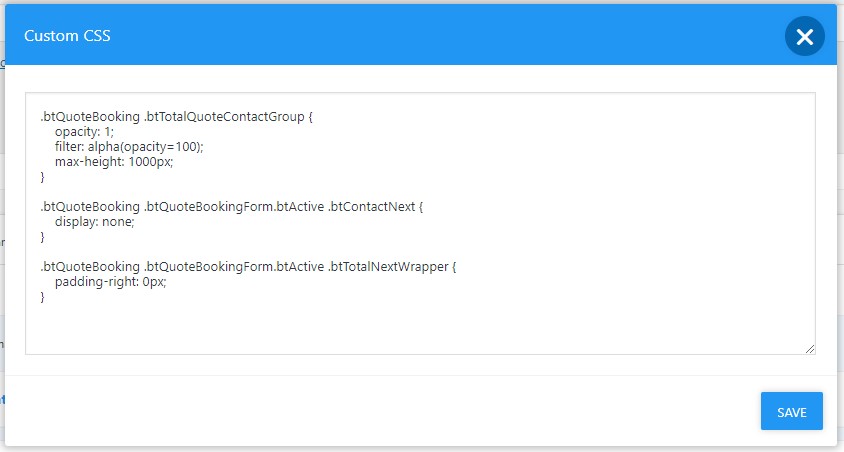
15. How do I remove the bar with Total and leave contact form?
Since plugin version 2.2.1 it is possible to remove total bar in Cost Calculator general settings panel.
*Note that this does not remove total price from the email users will receive.
16. How to edit clients email?
In order to change the clients email, then you should locate the bt_cost_calculator.php file and find function bt_cc_callback() in the code. The email formatting starts from the line:
$message_to_admin = ...
17. How to set initial value for Text item?
From Cost Calculator Version 1.2.1, initial value can be set in Cost Calculator Item Settings.
In order to set initial value for Text item, you need to add the starting value you want to 'Initial value' field.
Have a look how it looks at the frontend:
18. How to set initial value for Slider item?
From Cost Calculator Version 1.2.1, initial value can be set in Cost Calculator Item Settings.
In order to set initial value for Slider item, you need to add the value between min and max values, in 'Initial value' field.
For example, if you have items from 0 (zero) to 200 in your slider, and you want the initial value to be 2 items, you should add 2 to the field.
19. Importing Demo
The best way to start is to install demo content. If you want to install demo content please do the following:
Go to ‘Tools > Import > WordPress’ and install WordPress Importer plugin if it is not already installed.
When it is installed, choose xml file from demo_data folder and click ‘Upload file and import’. On the following screen make sure that ‘Download and import file attachments’ is checked. Click ‘Submit’ button and wait until import is finished.
You should see imported demo calculators in Cost Calculator panel.
20. How to install Cost Calculator plugin?
There are two methods of installing a plugin onto your WordPress site. You can use the WordPress Admin panel to upload and install the plugin, or you can use FTP software instead.
WordPress Plugin Installation
To install the plugin directly from the WordPress admin panel, please first log-in to your wp-admin console.
Navigate to Plugins > Add New,
Click Upload Plugin,
Click Choose File.
If you want to upload in admin panel, you need to extract plugin folder (bt_cost_calculator folder), from downloaded bt_cost_calculator.zip file and pack it again as zip and then upload that zip.
Click Install Now and the installation will begin.
Once the installation is complete, go to Plugins screen and look for the newly uploaded Cost Calculator in the list.
Click Activate to activate it.
FTP Installation
To install the plugin using FTP software, log in to the server where your WordPress website is hosted. First extract bt_cost_calculator folder from downloaded bt_cost_calculator.zip file.
Now connect to your server via FTP and navigate to the wp-content/plugins folder in your WordPress directory online. Upload bt_cost_calculator folder to the plugins’ folder on your remote server.
Once the plugin is uploaded, you need to activate it. Go to ‘Plugins > Installed Plugins’, find Cost Calculator and click ‘Activate’ button.
21. Contact form visible by default
Since plugin version 2.1.9, it is possible to display contact form below total bar by selecting 'Contact Form Initially Visible (Remove Next Button)' field in Cost Calculator settings panel, Contact form tab.
22. How to leave a review?
If you are satisfied with our support or you like our product, please consider supporting us by giving us a rating at the downloads section of your ThemeForest profile (just below the download button) - http://themeforest.net/downloads.
When leaving a review, we encourage you to:
Leave ratings and reviews that are honest, respectful and constructive.
Try to resolve any issues with the theme / plugin by contacting us first before leaving a negative rating and review.
You can find more information on reviews in official Envato article.
Thanks a lot in advance! :)
23. How to redirect users to another page after the "Next" button?
Please find the following lines in cc.main.js file:
1. The refund request is sent to us via email, and we decide if we are going to approve it or not.
2. Once the refund is approved, it can take between 3 to 5 days for Envato to transfer money back to your account.
3. If the refund is not approved, you can always raise a dispute.
You can find additional guidelines on the refund in the official Envato article.
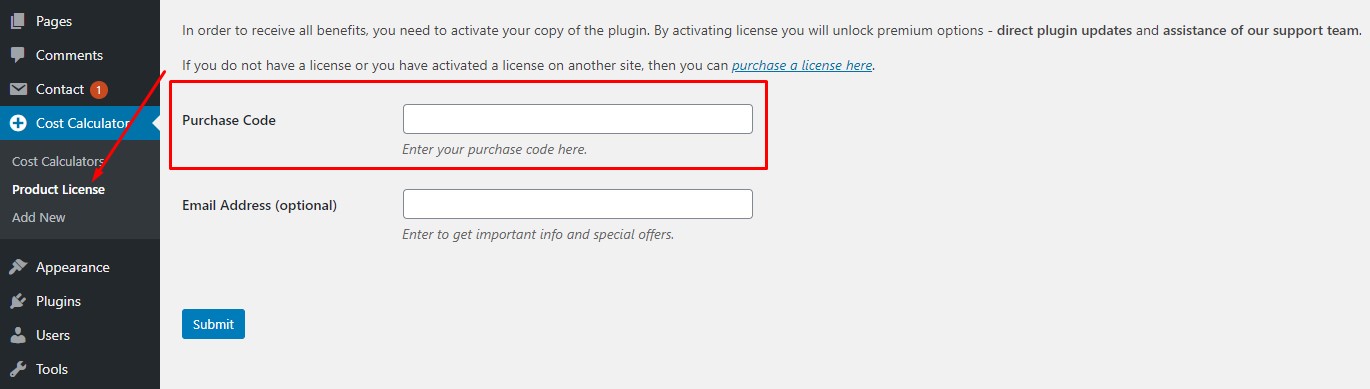
25. How to enter Purchase Code?
Since Cost Calculator version 2.2.4, once you install and activate plugin (or just update plugin to that version if you had it previously), a new option, Product License, will appear in Cost Calculator panel.
Once you enter Cost Calculator's purchase code you will be able to receive notifications about new plugin versions, and update it through your dashboard, in Updates panel.
Please note that you are not required to enter purchase code in order for the plugin to work. Registration with purchase code is only used to receive plugin updates through wp-admin panel.
26. How can I change total format’s display?
Since version 2.1.6. total format can be changed in Cost Calculator Settings panel.